
Whether you want to start your website for yourself or for your business, you can easily do that by following this guide.
No worries, we’ll go through this tutorial where the focus will be on the steps you must take to start your website that you can make quick, cheap, and easy!
PS: It takes just 15 minutes to start your website with a hosting company. But design, development, extensions, optimization may require 2-3 hours of your time!?
Three Things You Need to Build your Website
- The domain name: your custom web address (Free name with Bluehost)
- Website hosting: a service that hosts your website
- WordPress.org: free and easy to use (downloadable with Bluehost)
Select Your Website’s Name And Niche
First, It’s time to pick a name and niche for your new website. ?

The name of your website is what readers will see first (for example, myawesomewebsite.com.) My suggestion is that the name should represent either the general topics you’ll be writing about, a clever combination of words or it could be your own name.
You can choose literally any website’s niche, like politics, travel, health, food, fashion, lifestyle, technology, and otherwise. But make sure to go with a general topic area that you’ll be focusing your content around.
Incorporating a word or two that clearly tells the reader what your content is about is a big plus. Within the name of your website, you can insert words like greenavocado.com or healthylife.com) if you want your website to be about health or fitness.
To make things easy
Domain names can cost anywhere from $8 to $18 a year. You can buy them on websites like Namecheap or Godaddy. However, I have a better solution for you.
With a Webhosting company called Bluehost, you can get a registered domain name quickly and easily and set it up in 10 minutes or less.
Oh, and it’s super easy!
The domain name is included in the web hosting price, so you don’t have to pay separately.
So if you have a company or website name in mind, let’s go to the next step.
Bluehost WordPress Tutorial
Ok, if you are new here, you might be wondering about 2 things:
What is a web hosting company and do I need one?
To answer your first question, a hosting company provides the technologies and services needed for the website to be viewed on the Internet. Websites are hosted or stored, on special computers called servers.
When Internet users want to view your website, all they need to do is type your website address or domain into their browser.
So do I need one? That entirely depends on what you want. If you want to blog for your friends or share content for the fun of it then NO. But if you want a nice-looking, fast, and well-maintained website with your own chosen name, then the answer is YES!
In most cases, you WILL need a Webhosting company to start your website to store all your data, speed up your pages, provide maintenance and security.
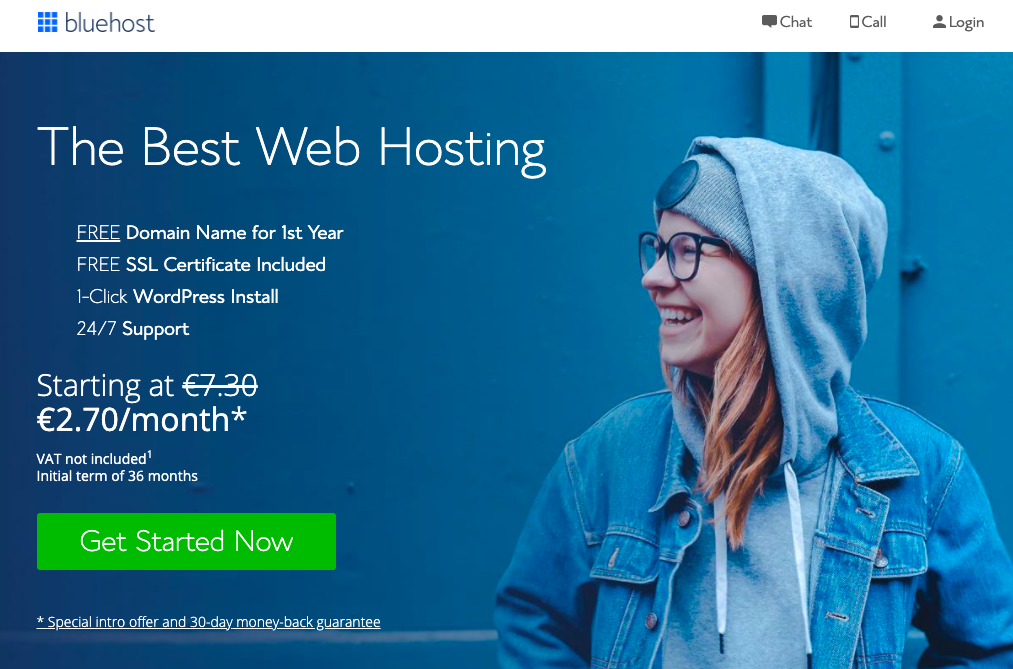
If you want all these in one package I would suggest starting out with a web hosting service I mentioned earlier, called Bluehost. Apart from being able to choose your domain name, there are many perks that are included in the price.
The only drawback with Bluehost is that you can only pay a yearly package instead of a monthly one. In the long term, you can SAVE A LOT of money. But you have to pay a little extra upfront. But the long-term payoff is really amazing and I would highly recommend you using Bluehost. Of course, if you are unhappy, they have a 30-day return policy.
With that in mind, let’s get started making your website’s domain name! It should take about 10-15 minutes.
Choose your plan
First, you’ll select a hosting plan (inputting your website’s domain name comes next). Personally, I would recommend choosing the Choice Plus plan because it comes with multiple perks like “Domain Privacy,” which will protect your personal information (your full name, email address, phone number, and home address) from being published anywhere online.
Choosing your plan will look like this right here. Just click the green “Select” button on your plan of choice:
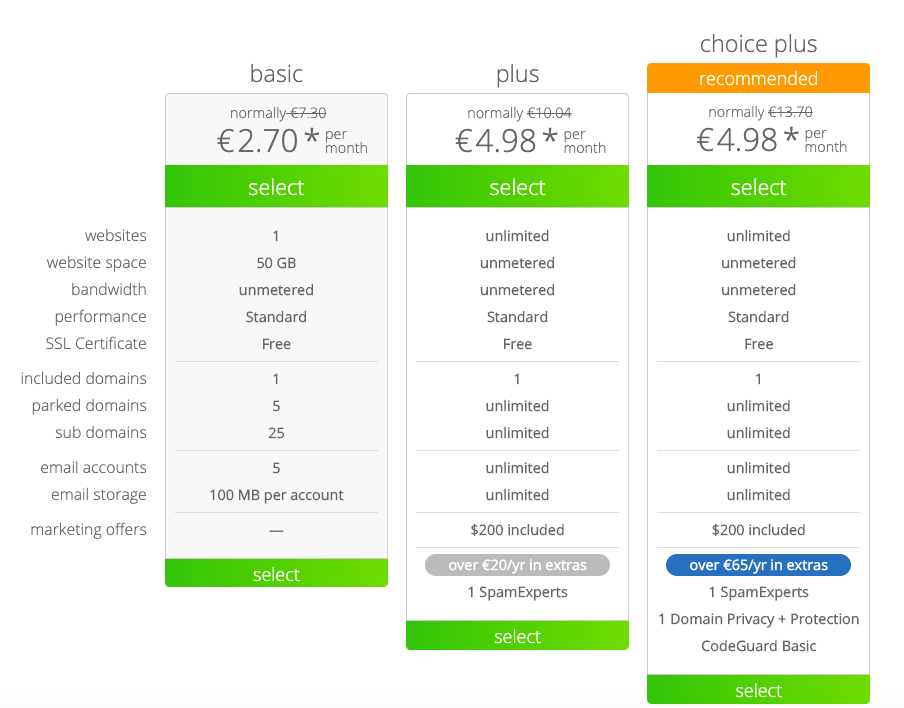
As I said above, I recommend choosing the Choice Plus plan, so that you’re getting the Domain Privacy feature that’ll protect your personal information online, but any of these plans will do as you start your website. You can add the domain privacy in later during the checkout process for around $1/mo.
Pick your website’s name
Next, you’ll get to the page where it’s time to choose your blog’s domain name if no one has taken it before:
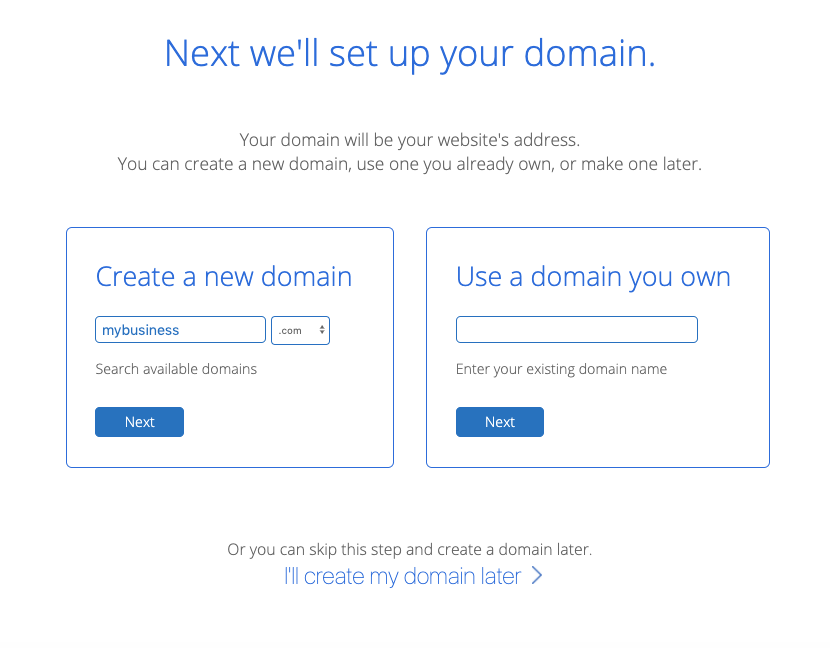
Once you get to this step in the checkout process, just type in the name of the domain name that you’d like your blog to have (mine is robertkormoczi.com).
If your domain name of choice isn’t available, you can either try another option that comes to mind—or select different domain registries such as .com or .net or .org. It is up to you, but my recommendation is always to go with .com if you want to run a business.
You can always choose I’ll select my domain name later after getting the rest of your account squared away and taking a little more time to think of the name.
Here’s where you can click to choose your domain later (it’s a popup that will appear if you hover on this page for long enough or move your mouse up toward the top of the page):

After either choosing your domain name or opting to select it later, you’ll be taken to the final step in the signup process—creating your account.
Start your Bluehost account
Start by filling in your account details like your name, email address. It’s VERY IMPORTANT to use an up-to-date email address because this is where your login details and account information will be sent.
If you don’t want to enter your information manually, you can connect your Bluehost account with your Google account.
Select the right hosting package
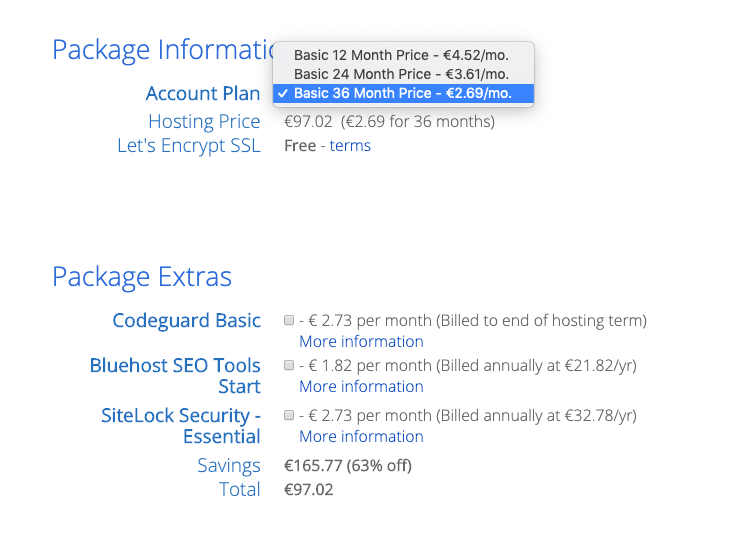
This is where you’ll choose an account plan based on the price you want to lock in and how far in advance you’ll pay.
Note that (as mentioned before) Bluehost only offers options for you to pay 1, 2, or 3 years upfront. They don’t offer a monthly payment option. Why? Simply because most hosting companies that do offer monthly payments tend to charge a bit more.
Even still, with whichever plan you choose, the price works out to be a great investment to start your website and get it online today!
Which pricing plan would suit my website best?
Personally, I recommend choosing the “Prime 36 Month Price” if you want to lock in the lowest possible price for your hosting for the next 3 years. This low pricing for new customers only applies to the first payment you make.
If you were to choose the 1-year plan, your pricing might go up after that first year.
That’s why if you choose the 36-month plan, your pricing will be locked in at this rate for 3 years. For that reason, I recommend going with the longest-duration plan that your budget can spring for.
And that’s it. That is all the money you will need to spend to launch an online business. Fingers-crossed?
Which package extras should you choose?
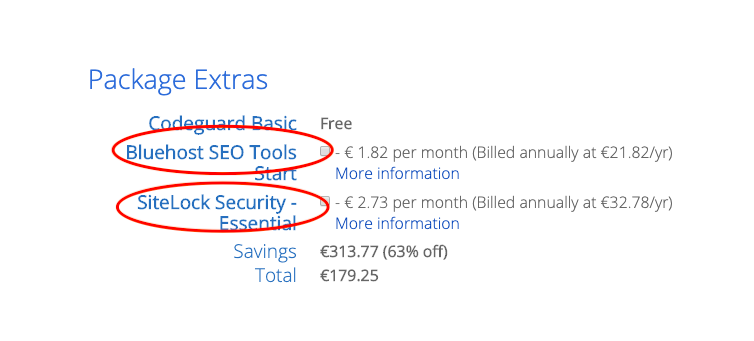
Like many others, I’d also recommend keeping the Sitelock Security Extras extra, but you can get away with skipping the rest. Sitelock basically helps you protect your website from malware and malicious attacks.
Bluehost SEO Tools provides insights into your performance. I would say this might not be necessary because there are other ways such as Google Analytics or Monsterinsights.
As I mentioned earlier though, having the domain privacy keeps all of your personal contact information (your name, email, phone number, and address) private. Now, if you chose the Choice Plus Plan on the previous screen, then your Domain Privacy Protection will be listed as “Free” just like this screenshot above shows—it’s included in that plan.
The total you’ll now see is the amount you’re going to pay today. Remember though, you won’t have to pay again for 1, 2, or 3 years depending on the package you chose.
There’s a 30-day money-back guarantee in case things don’t go as planned with your blog.
Enter your billing information
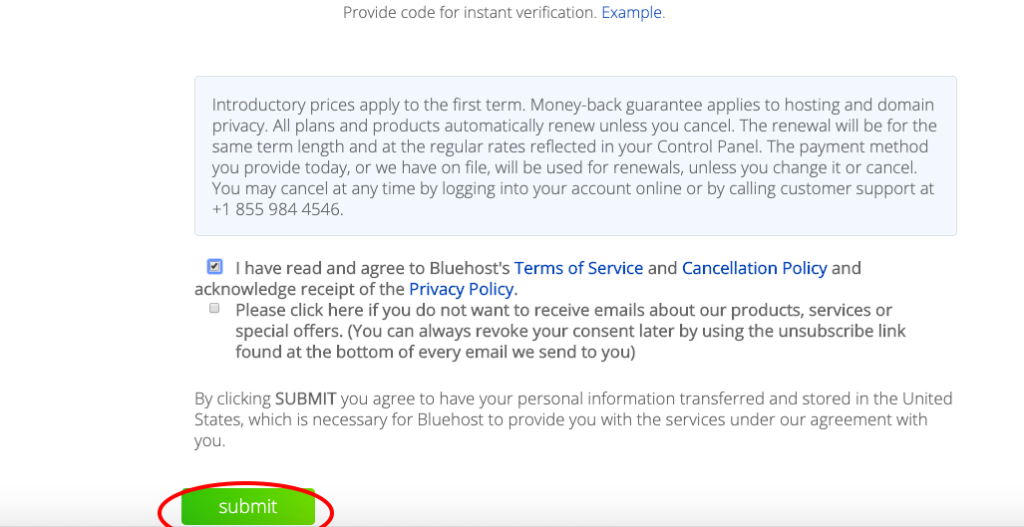
Now you’ll input your billing information, check the box that you agree to Bluehost’s Terms of Service, and then hit the green “Submit” button.
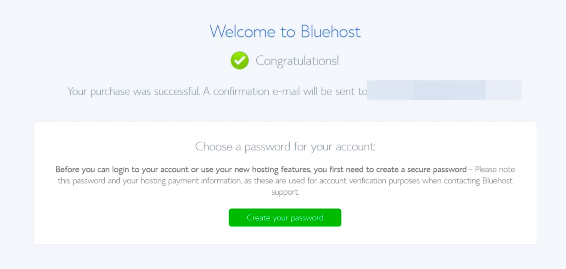
Congratulations!?
You’ve officially completed the first major step in order to start your website.
With the initial signup process complete, it’s time to move into the next stage of getting your website running and fully optimized.
On the next page, you’ll be guided step-by-step through the process of getting WordPress installed on your blog through Bluehost—and later on, in this guide, I’ve got a ton of helpful tips for optimizing your blog, free and cheap plugins you can install to help get your blog looking great, and more.
Start using WordPress
At this point in this guide, we will continue under the assumption that you’ve already registered your domain name and chosen the right hosting plan. So if you haven’t done so already, take just a few minutes to quickly launch your domain.
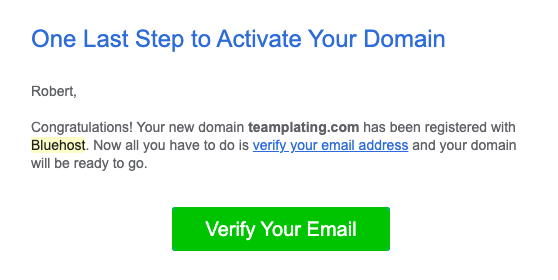
Once you’ve made the payment, you will get a verification email along with payment verification. You need to verify your email first.
The following steps are very easy. All you need to do is enter your password and log in. Next, you will be taken to a new page where you can select your theme, or simply scroll down and click on “skip this step.”
There are dozens of new themes to pick and the ones I recommend will come for free. So you don’t need to worry about these.
(What is a theme? A theme is basically the overall appearance of your website. With WordPress, you’ll have thousands of themes to choose from, to decide what the outline of your website is going to look like. There are many paid themes, however, I will show you only the best-looking ones for free!)
If you’ve never worked with WordPress it will be super easy, I can promise you, this won’t get too technical.
How to install WordPress and get friendly with its Dashboard
Once you’ve created your password you will be taken to Bluehost’s dashboard where you can click on “Log in to WordPress” and be automatically taken to your WordPress Dashboard.
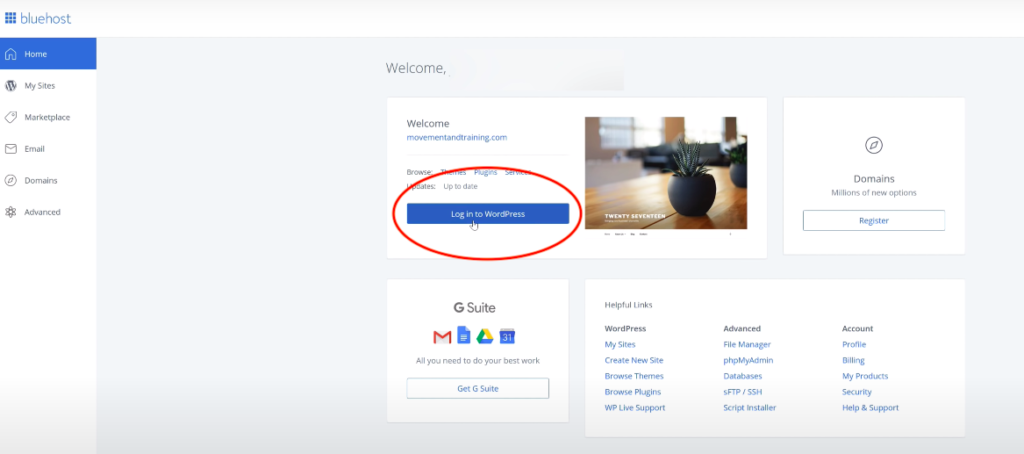
Once you get to this point, you can officially start the design of your website. This is where the fun begins. Below is your WordPress dashboard where you will be able to create pages, write and publish new content, upload extensions, create your webshop, and much more.

In the meantime, you might be asking yourself: “But why WordPress?”
If you want to start your website and make real money from it, WordPress is your only smart option.
Let’s cover some basic terminology, so you understand why WordPress is the right platform (also known as a Content Management System or CMS) to run your website on.
Design and Scale-up your Website for Free

When you’re just getting started, I don’t usually recommend buying a paid WordPress theme right away. Once you have some traffic and can justify the investment, then it’s smart to choose a premium, paid theme with more features and options.
For the time being, a complex theme will be a distraction from your most important priority of actually bringing readers to your new blog.
WordPress comes with a ton of free themes to choose from, so start with one of the options you like in Appearance > Themes > Add New Theme and lick on Popular on the top. You can get a ton of themes without spending much time for now. You can always come back and change it later with 2 clicks. In the top right “search” you will be able to find any theme you’d like.
What I would recommend is either use Hello Elementor or Astra. Both of these are 100% free and can be used to create beautiful pages on the spot). There is also Genesis pro, which you can use to enhance your default WP editor. (You can find out more on Genesis pro vs Elementor Pro.)
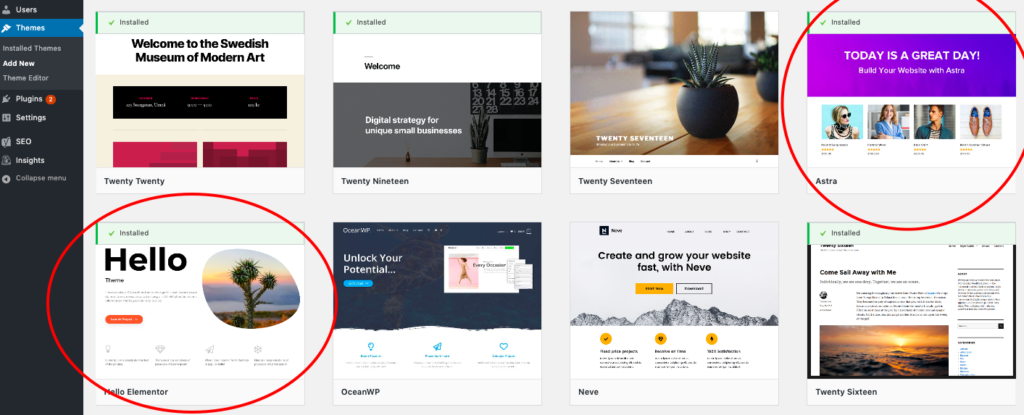
I like these two WordPress themes because they’re both easy, clean, free to use, simple and will get you to a great starting point without needing to invest in a paid theme as you’re starting out. There are thousands of themes to choose from, so you can change them whenever you want to.
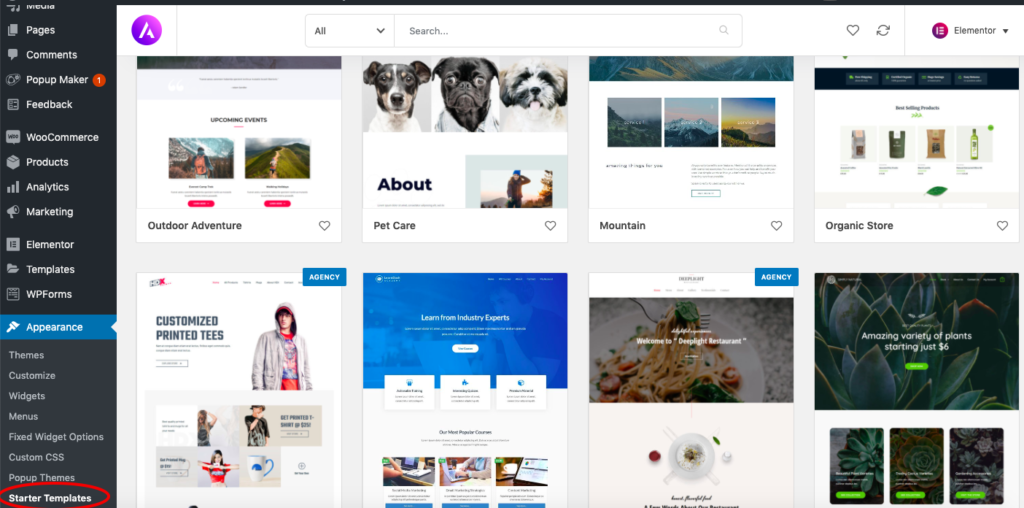
Once you have Astra as a theme, you can go to Appearance and then Starter Templates, where you can select your own outlook on your website. You can change these any time in the future.
Why is Design so Important?
The short answer is because of your readers. Even if you don’t really care about design, your page visitors will shift their behavior quite dramatically based on the features of your website’s layout. Researchers found that users judge a website’s aesthetic beauty and perceived functionality in 1/20th of a second.
What this means, is that within milliseconds, a reader can decide whether or not to trust your website or click exit.
The best designs are simple, clear, and easy to read. It tells your visitors that you care enough about your website and that it is trustworthy at first glance. Just avoid using too many animations or fonts and colors.
Keep it simple! Download Elementor!?
I think the design needs no special introduction. You have to test out what you like and select the theme that suits you the most. Most people I know use Elementor, a plugin, which I will talk about in the next step. This helps WordPress users design every aspect of their website and give it a charming and well-layered look.
Activate these Plugins
 A WordPress plugin is a small piece of add-on or an extension that gives extra features or functionality to a WordPress website.
Plugins let you add all sorts of features from collecting email subscribers to building webshops, tracking your website analytics, optimizing your images, increasing your page load speed, and much more.
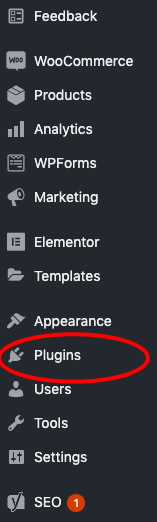
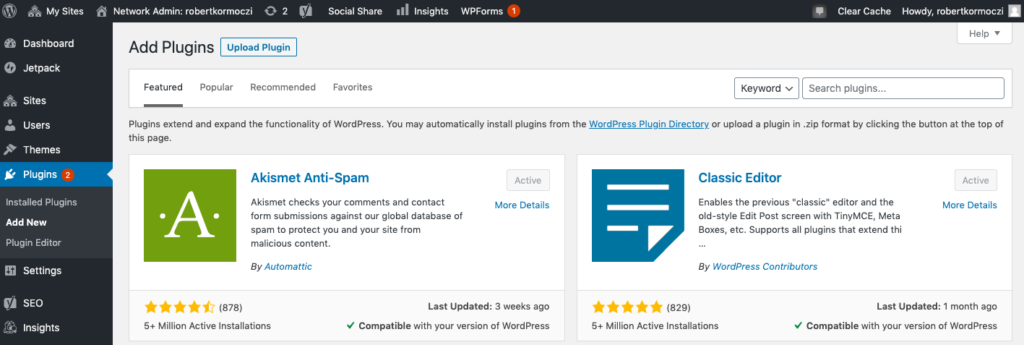
There is basically a plugin for almost everything that you want to do in WordPress. Go on Plugins and click on Add New Plugin.
The only problem is that there are literally thousands or in other words: too many plugins to choose from. To help you cut through all the noise… these are the 10 must-have WordPress plugins to install and activate.
These plugins any digital marketer or web designer would highly recommend and I have to agree with them.
- Yoast SEO: The most important one. Yoast WordPress plugin helps you to optimize your posts’ titles, descriptions, content length, and other elements across your entire blog so that you can be found easier by search engines.
- WP Rocket: This plugin helps you clean all unused data the would slow down your site. Caching creates an ultra-fast load time, essential for improving Search Engine Optimization and increasing conversions. When you turn on WP Rocket, page caching is immediately activated.
- WPForms: You’ll want your readers to be able to get in touch with you easily, which I highly recommend as it’ll encourage other page visitors to collaborate or reach out to you. WPForms is an easy-to-use plugin that allows you to drag & drop contact forms onto any page of your website.
- Google Analytics Dashboard for WordPress: This is a 100% free Google Analytics plugin that allows you to see all of your relevant analytics data directly inside WordPress. Connect the plugin to your Google Analytics account to find out who’s coming to your site, how long they’re sticking around, and what your most popular pages or article are.
- UpdraftPlus: Again, sometimes things will go wrong on your blog (and it won’t always be totally in your control). It’s always smart to have a backup plugin that’ll save all your hard work on a regular basis, and this free one stands high above the rest.
- Woocommerce: This is an open-source eCommerce solution built on WordPress. Basically, you can build your very own online store for FREE and can start selling, dropshipping, or providing online services with this plugin.
- WP Rocket: Faster websites rank better in Google and give your readers a better experience. WP Rocket is a plugin that caches your pages, reduces your file sizes, and does much more to ensure that your blog loads faster for everyone.
- MaxCDN: Speaking of speed, MaxCDN makes images and other static elements of your blog load faster as well, earning this plugin top marks to consider as a complement to also using WP Rocket.
- Insert Headers and Footers: Sometimes to edit your theme, you’ll have to add code snippets to your header or footer (it’s not as scary as it sounds). However, doing it in the code of your theme can cause issues. This plugin lets you add small snippets of code easily to select locations around your blog.
- Elementor: If you don’t want to bother with themes, you can always use Elementor as a simple page builder. This is the most popular visual editor for WordPress and quite easy to use.
- Bonus Plugin – Akismet Antispam: You will get a ton of spam messages as your website generates more traffic. These spam comments usually try to sell useless, nonsensical products or try to link you to spammy websites of no value. This plugin will automatically block all spam comments.
I would say, that you should activate all these plugins before moving forward and discover their functions one by one. But the most important ones to use at the start are Yoast SEO, Google Analytics for WordPress, and Elementor.
How do I build my Pages?
Every website needs to showcase some basic, foundational information. Who you are. Why people should listen to you. How they can get in touch with you if they have questions or want to work with you.
These pages are all pretty standard, but they’re also a great way to let your readers get to know you. Introduce who you are and tell your story, but also don’t make it too narcissistic. After a brief intro, explain your value proposition (for potential clients looking to hire or work with you. If you can, show off some of your recent achievements or references.
You might not think much about it, but your About page can quickly become one of the most popular pages on your website
Before we get into making your pages, I would advise you to set your homepage to be where your blog posts display (for now). You can do this by going to Settings again and Reading. You will get to what you can see in the image below. We can create separate pages in the menu section in the future and call it “Blogs”, where we can transfer all your published blog posts or articles. But creating menus will be in the next few steps.
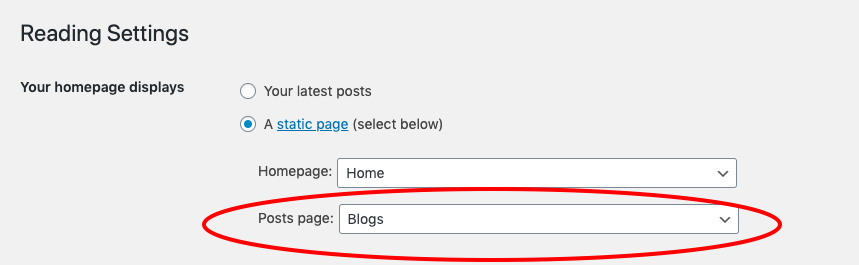
If you’re setting your homepage to be the blogs, then one thing you can consider is changing the settings to show the complete text of your blog posts right on the homepage, rather than a list that has short previews of each post.
Since you won’t have many posts on your WordPress blog for the next few days or weeks, it’ll make it look like there’s more content in the short-term. You can change the settings back to a list and preview format once you’ve gotten your first 5 or so posts published.
To change these settings, just go back to Settings > Reading as it shows in the image above.
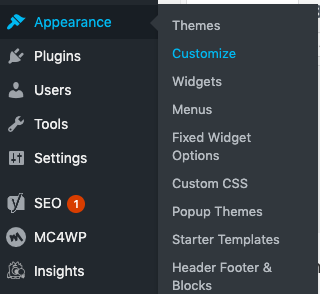
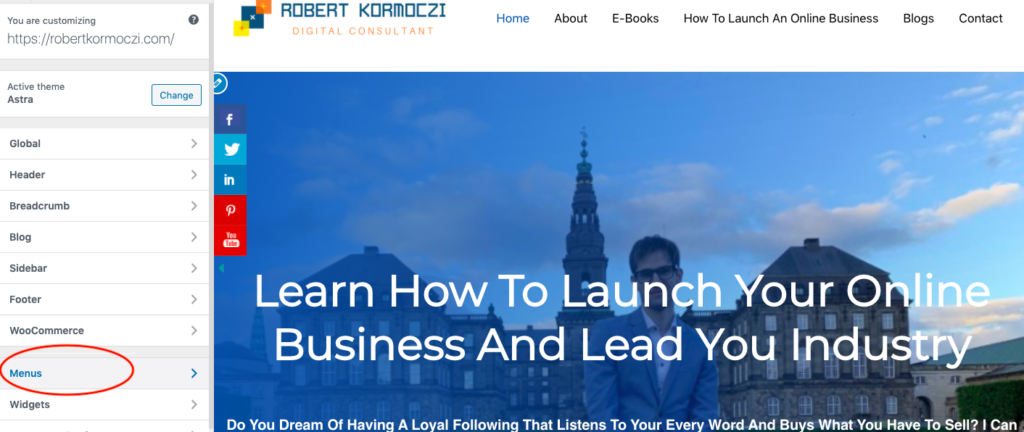
The first thing you need to do is to go to Appearance and from there to customize. From there you will be taken to a whole new setting where you will have the chance not only to customize your menu (pages) but work on the frontend visuals of your website. You can experiment as much as you want as long as you don’t publish something. Make sure that if you want to keep your changes, you can save them in a draft. but if you are uncertain about what you are doing, don’t hit Publish.
As you can see below on my website, for example, I can customize my menu above the Widgets section. Click on Menus and the next option will appear on your sidebar.
You will have the option to change the “Footer,” “Menu” and “Primary Menu.” Click on the Primary Menu or the one that says with small letters “currently set to: Primary Menu.” Either way, you’ll have a primary menu and can create the second one underneath it, (but that is for later.)
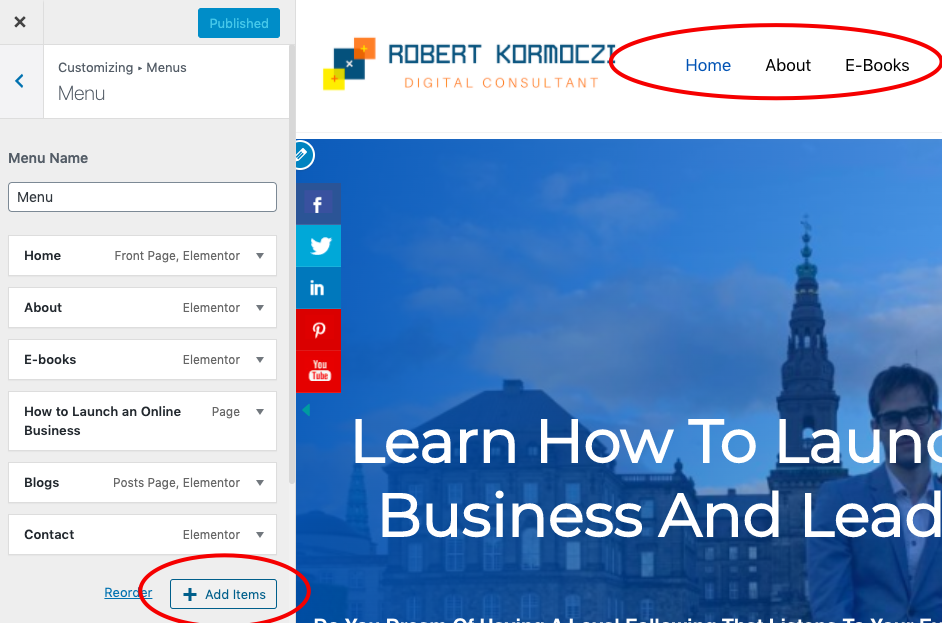
Once you’re done with all your menu options, hit Publish and it will appear on every page of your website.
You only have the chance to add or remove your pages from your menu. Just go to Appearance > Menus and you can add them in just a few clicks.
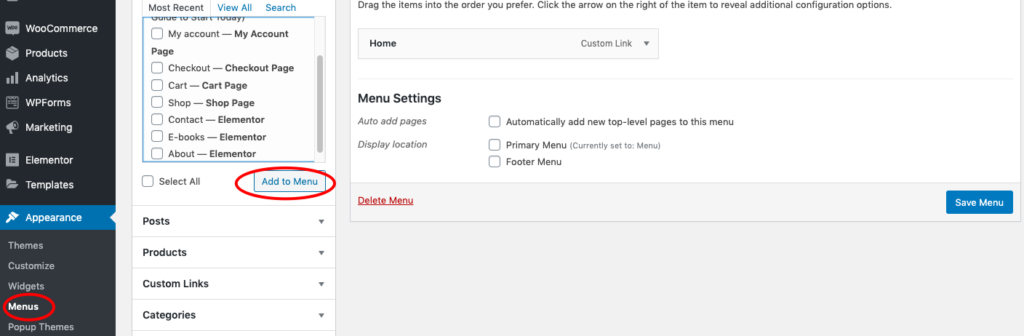
For right now, I would suggest focusing on your Main pages (About, Home, Blog, Contact, Shop, etc.) When you’re ready to create a homepage or footer menu, just go to Appearance > Menus and you can create them in just a few clicks.
Alright, we’ve covered the basic foundations of getting your WordPress set up. Now, let’s dig into creating a few of the main pages on your website.
How to Publish your First Post
Alright! So we are nearly done! But let’s leave the best for last. Your posts where you can publish all your articles, blogs, stories, and add your images, videos, gifs, and hyperlinks.
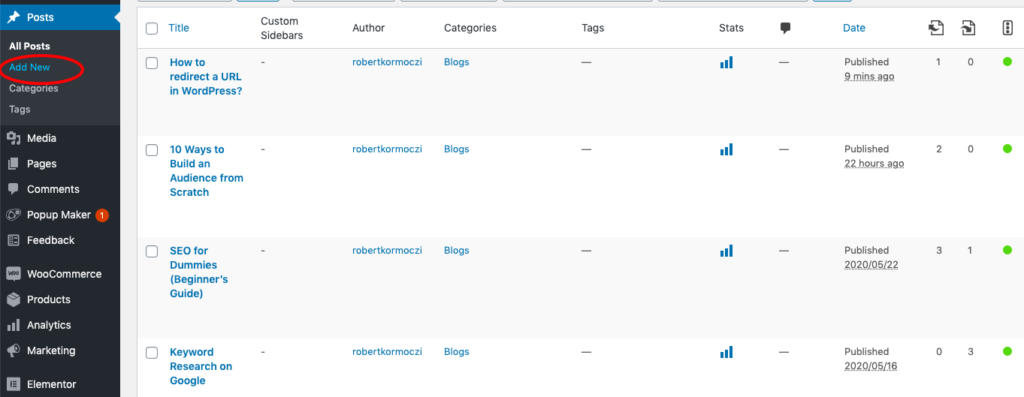
Once you’ve decided on the first article you want to write, you’ll navigate to the “Add New Post” section from your WordPress Dashboard.
Go to Posts > Add New which will look like this right here:
Next, you’ll be taken to a brand new article page where you can start working on your content:
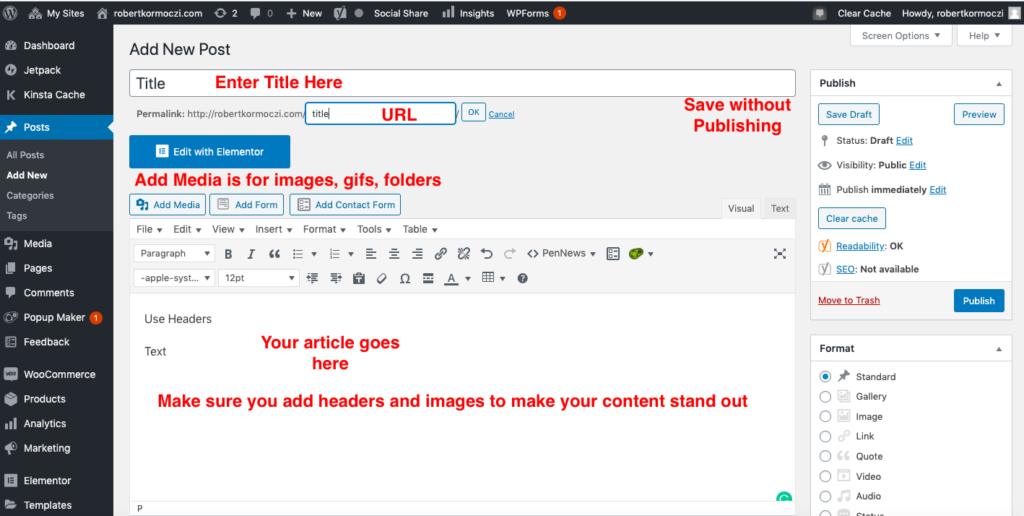
One of the reasons you chose to start an article is to attract readers to your website, right? It’s important to write an article headline that encourages readers to click. It is important to spend time and effort on writing headlines and content that’ll be interesting and engaging. But most importantly it must deliver on the promise of what your article is actually helping the reader with the info he/she needs.
So let’s say for example that your website is about travel. After doing some keyword research, your first article could be about destinations with great locations to discover. Whatever you do, you must always satisfy search intent. And people will keep coming back to you.
If you need help with understanding Keyword Research, I have three complete and easy guides on the topic to maximize your articles’ readership and outreach.
-
Keyword Research on Google
-
How to Build Traffic to your Website
-
10 Ways to Build an Audience from Scratch
But in short, keywords are ideas and topics that define what your content is about. In terms of SEO, they’re the words and phrases that searchers enter into search engines, also called “search queries.” Keywords play a major role for people on Google, Bing, or Yahoo to finding your articles and even buy from you.
You should always click on “Save Draft” every now and then in order to save your work. Only click Publish when you are absolutely sure you want.
Let’s Recap
- We’ve taken some time to think about a name for your website, whether that domain name is available and a specific niche you would enjoy covering on your website.
- We have gone through some hosting companies and selected Bluehost as the easiest and most cost-efficient way to launch your website.
- We have downloaded and launched WordPress to get started with work.
- It took some steps, but we got familiar with themes for design and layout, plugins for extensions, and building pages.
- In the end, we went to the Posts section to see how one can publish an article.
If you’ve followed these steps you’d be able to continue building your own website and even make a living. There is still a lot of work to be done. But once you have your WordPress website, you can work your way through everything with the help of Elementor and Astra for free. ?

Robert is a part-time blogger and internet entrepreneur. Join Robert and thousands of other monthly readers to learn how to build and scale up the next-gen of online entrepreneurship. While running this blog, Robert is the founder of his media company, Times International, and a PR Team Lead at Lensa.