
If you’re looking for an easy, step-by-step guide to learn how to start your blog like it is your own virtual business and make money from it… then you’ve come to the right place.
Let’s assume you want your own website. You want to write, sell, consult, or advertise something! But most importantly you want to make money by sharing something you are passionate about.
Even if you cannot spend hundreds of dollars every month to hire a freelancer or a web developer you can still get your business online today. But we have to take the long road ourselves and do the heavy lifting ourselves. Ugh! ?
Don’t worry, I’ve got you covered with all the necessary details to get everything sorted! And it will all worth it! 🙂
This is a complete step-by-step guide from launching your business to building an eCommerce store to the promotion of your business online and turning a profit.
Be aware that this is a long tutorial, so take a couple of breaks. You can also download this article as an ebook and follow it later on: here.
We will start out by launching your very own WordPress website with a hosting company. This is the only time you will have to pay a (small fee monthly or yearly to get started.) Everything else will be either free or have a freemium version.
The next steps will include designing and setting up your website.
Let’s get started by following these 10 steps I have simplified:
Notice: The titles marked with two colors:
- BLUE is the one you should follow.
- RED are points of interest and explanations.
Now without any further ado, let’s bring your business online and dominate your niche
Select your Company’s Name and Niche
First, it’s time to pick a name and niche for your new business. (If you haven’t done it yet.)

The name of your website is what readers will see first (for example, mybusiness.com.) My suggestion is that the name should represent either the general topics you’ll be writing about, a clever combination of words or it could be your own name, (just like mine.)
You can choose literally any website’s niche, like politics, travel, health, food, fashion, lifestyle, technology, and otherwise. But make sure to go with a general topic area that you’ll be focusing your content around.
Incorporating a word or two that clearly tells the reader what your content is about is a big plus. Within the name of your website, you can insert words like (greenavocado.com or healthylife.com for example) if you want your website to be about health or fitness.
Can’t decide what to name your website?
If you’re struggling to come up with an idea to name your business, or which topics you will write/talk about in the first place, my suggestion is to go with the flow and start anyway!
Most people find inspiration midway. Rather than spending time trying to come up with the perfect idea, you can find it along the way and see what you want with it.
What if the domain name I want is not available?
If you follow my guide and start your website with a hosting company like Bluehost or Dreamhost, they’ll let you choose your domain name later. If the domain name you want isn’t available, don’t feel stuck.
Just select the option to choose your name later after getting everything else set up and you can have more time to think. We are here for execution, not perfection. You will have ample time to think about a name.
You can find out quickly if a domain name is still available on Namecheap.
What if I want to change the name of my website later? Can I do it?
The short answer is: “Yes you can easily change the name of your website later. BUT you’ll have to buy a new domain name which will cost you at least around $7 to $18 on Namecheap. It’s something you can always change in the future.
But I would advise you to go with Bluehost and be decisive with your company name.
Get your Dream Business Online (Web Hosting)
The second step of starting a website is getting your ideas online. That’s what a web hosting company is made to do. In this step, you’ll be selecting your website’s platform and web hosting plan you’ll use to get your business online.
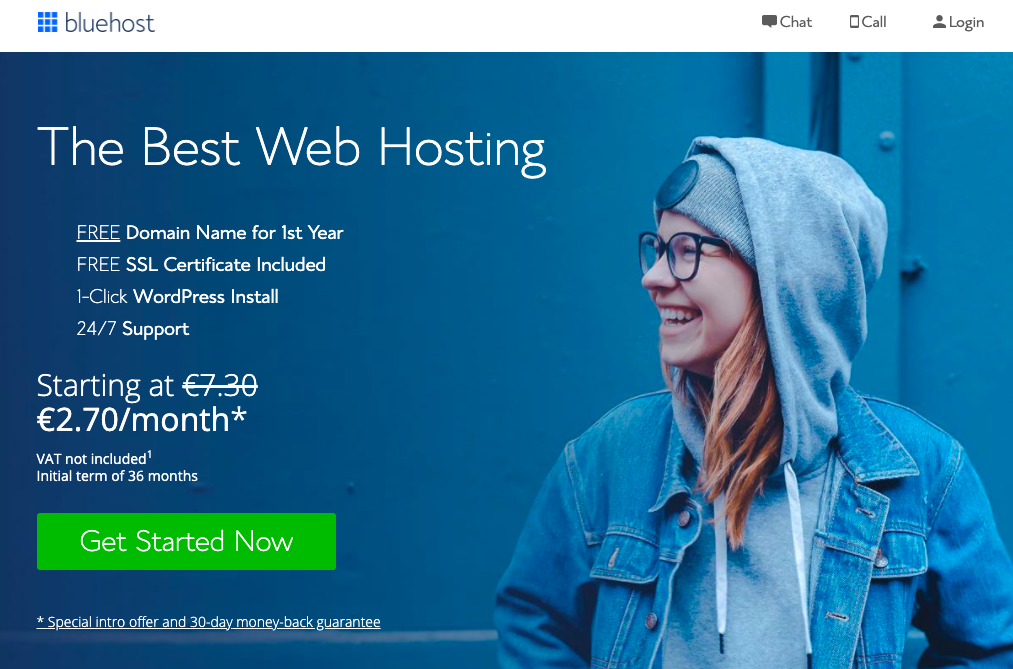
I will be using Bluehost because of its low price and trustworthy qualities that will come in handy. (This is what I and many others recommend for starters.)
So what is web hosting?
Web hosting is basically a necessary platform for any website for other people to access you on the internet. The “web host” gives security, stores all your website files, and makes sure that website surfers can access your website when they click on a link or type in your website’s name or URL.
The best way to describe a hosting service is basically imagining the interior of your shop or store. When someone comes over (types in your website’s name), they’ll be able to see what’s in it and make good use of all resources and services.
How much does web hosting cost?
Web hosting comes at different costs from $2/mo to $30/month. That is why I would recommend a high-quality hosting provider like Bluehost, which is cheap in comparison to what it offers. Having a proper hosting company to power your website is one of the most important investments you can make.
Are there other trustworthy web hosting services?
Certainly! There are several great web hosting providers you can use to host on a budget. The company I’ve found that best checks all the boxes for new websites is Bluehost.
Regardless of who you choose, you should be looking for a web hosting company that prioritizes speed, user-friendly, stays secure, and has a support system in case of errors or downtime.
—> Click here to enter Bluehost and hit the green “Get Started Now” button
2.1, Choose your Plan
First, you’ll select a hosting plan (inputting your website’s domain name comes next). Personally, I would recommend choosing the Choice Plus plan because it comes with multiple perks like “Domain Privacy,” which will protect your personal information (your full name, email address, phone number, and home address) from being published anywhere online.
Choosing your plan will look like this right here. Just click the green “Select” button on your plan of choice:
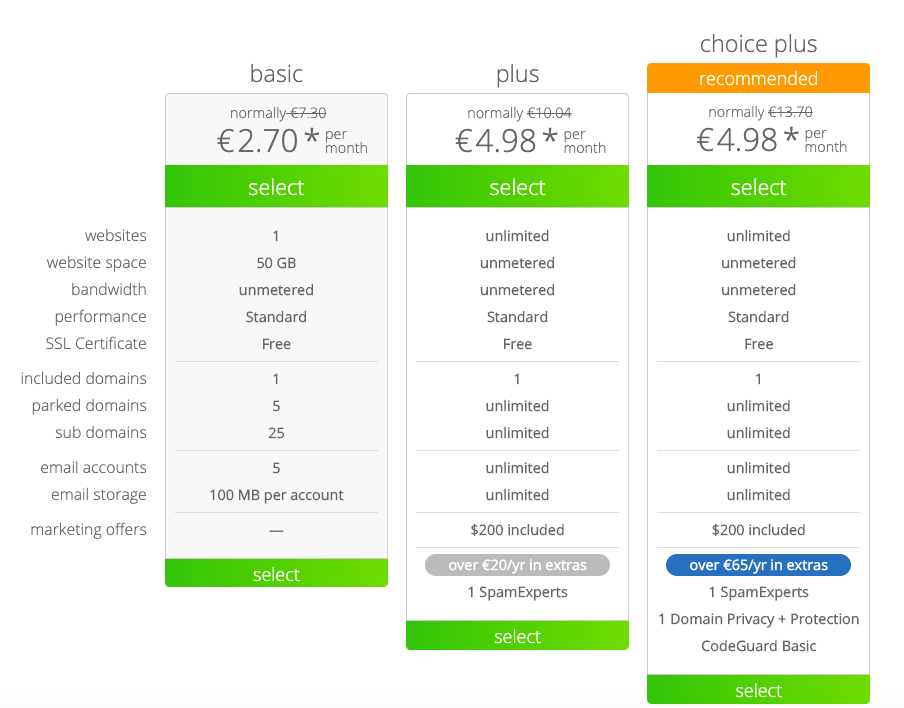
As I said above, I recommend choosing the Choice Plus plan, so that you’re getting the Domain Privacy feature that’ll protect your personal information online, but any of these plans will do as you’re starting your website. You can add the domain privacy in later during the checkout process for around $1/mo.
2.2, Pick your Company’s Domain Name
Next, you’ll get to the page where it’s time to choose your website’s domain name if no one has taken it before. 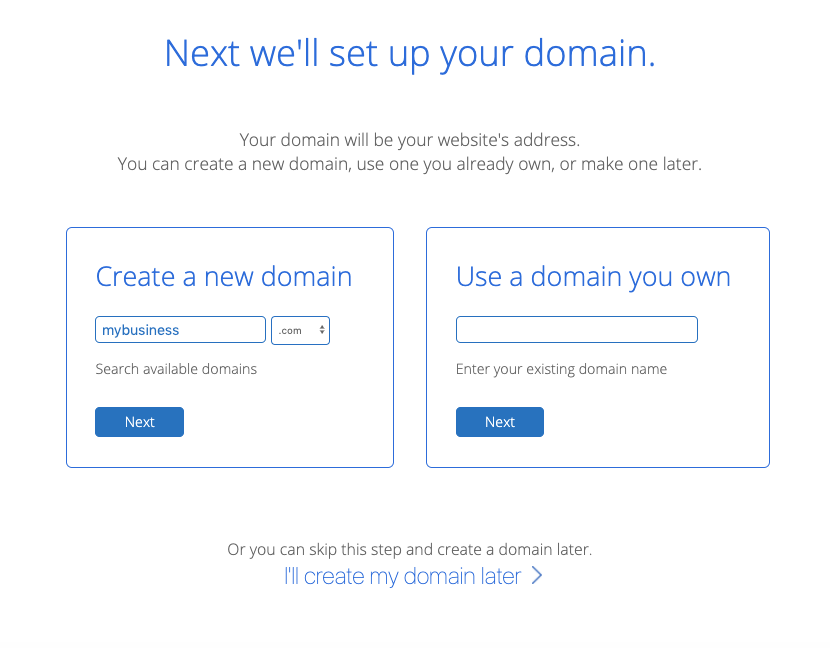
Once you get to this step in the checkout process, just type in the name of the domain name that you’d like your blog to have (mine is robertkormoczi.com).
If your domain name of choice isn’t available, you can either try another option that comes to mind—or select different domain registries such as .com or .net or .org. It is up to you, but my recommendation is always .com if you want to run an international business, (unless you want to do everything locally.)
In that case, you should select our country’s TLD (Top-Level-Domain) like .de if you are German or .ru if you from Russia. You can always choose I’ll select my domain name later after getting the rest of your account squared away and taking a little more time to think of the name.
Here’s where you can click to choose your domain later. (There’s a popup that will appear if you hover on this page for long enough or move your mouse up toward the top of the page):

After either choosing your domain name or opting to select it later, you’ll be taken to the final step in the signup process—creating your account.
2.3, Launching your Bluehost Account
Start by filling in your account details like your name, email address. It’s VERY IMPORTANT to use an up-to-date email address because this is where your login details and account information will be sent. If you don’t want to enter your information manually, you can connect your Bluehost account with your Google account.
2.4, Select the Right Hosting Package
This is where you’ll choose an account plan based on the price you want to lock in and how far in advance you’ll pay.
Note that Bluehost only offers options for you to pay 1, 2, or 3 years upfront. They don’t offer a monthly payment option. Why? Simply because most hosting companies that do offer monthly payments tend to charge a bit more. Even still, with whichever plan you choose, the price works out to be a great investment for starting your own website and getting it online today!
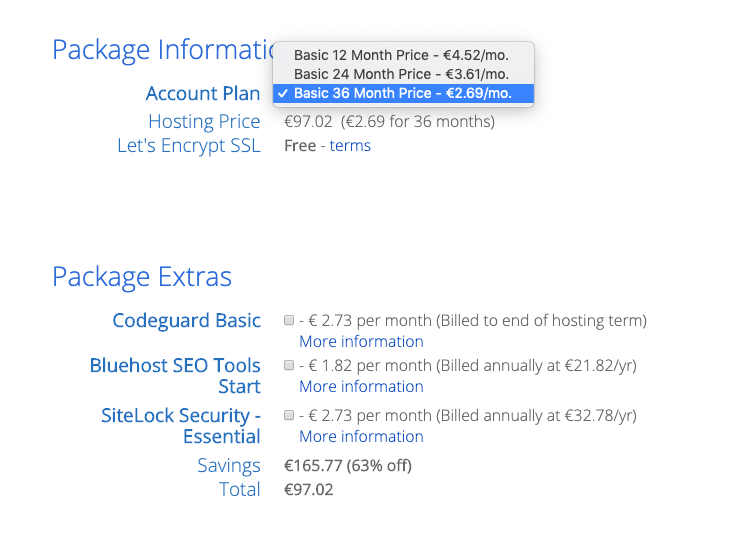
Which Pricing Plan would Suit my Website Best?
Personally, I recommend choosing the “Prime 36 Month Price” if you want to lock in the lowest possible price for your hosting for the next 3 years. This low pricing for new customers only applies to the first payment you make. If you were to choose the 1-year plan, your pricing might go up after that first year.
That’s why if you choose the 36-month plan, your pricing will be locked in at this rate for 3 years. For that reason, I recommend going with the longest duration plan that your budget can spring for.
And that’s it. That is all the money you will need to spend to launch an online business. All other services from this point will have free subscriptions and services with the possibility of expanding once your business takes off.
Fingers-crossed ?
Which Package Extras should you Choose?
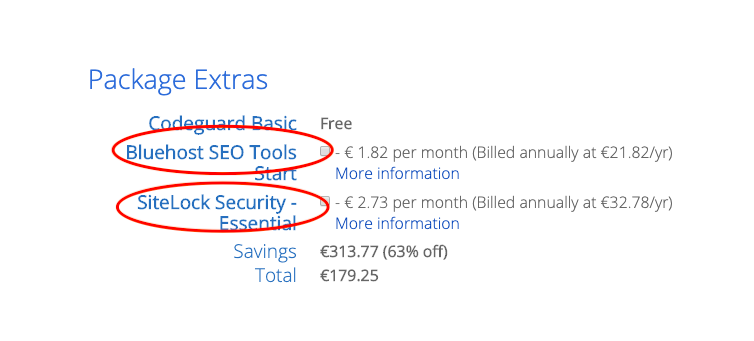
Like many others, I’d also recommend keeping the Sitelock Security Extras extra, but you can get away with skipping the rest. Sitelock basically helps you protect your website from malware and malicious attacks.
Bluehost SEO Tools provides insights into your performance. I would say this might not be necessary because there are other ways such as Google Analytics, Google Console, or Monsterinsights.
Later on, I’ll show you all the FREE plugins & tools you can use for things like SEO optimization, additional security, fast website speed, and site back-ups, rendering most of the other package extras not necessary.
As I mentioned earlier though, having the domain privacy extra keeps all of your personal contact information (your name, email, phone number, and address) private. Now, if you chose the Choice Plus Plan on the previous screen, then your Domain Privacy Protection will be listed as “Free” just like this screenshot above shows (it’s included in that plan.)
The total you’ll now see is the amount you’re going to pay today. Remember though, you won’t have to pay again for 1, 2, or 3 years depending on the package you chose.
There’s a 30-day money-back guarantee in case things don’t go as planned with your website.
2.4, Enter your Billing Information
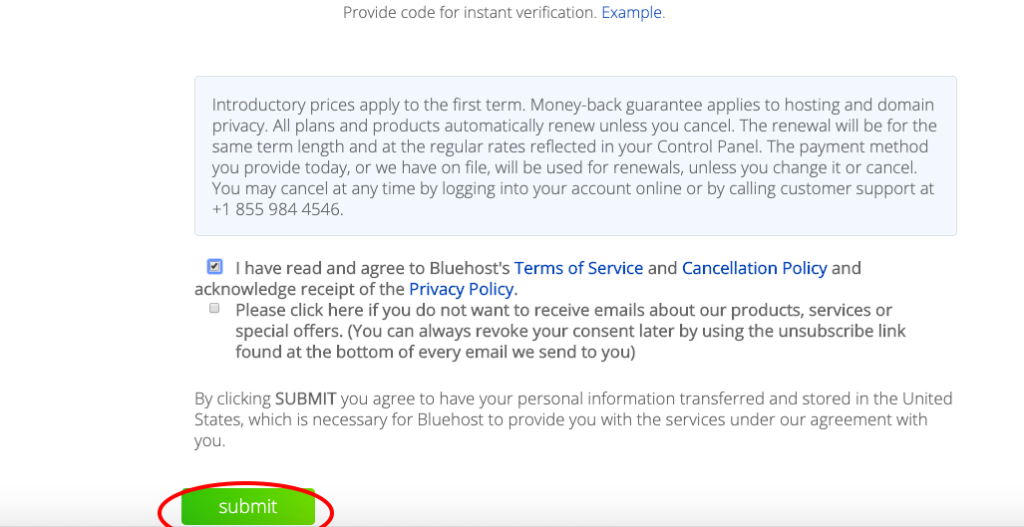
Now you’ll input your billing information, check the box that you agree to Bluehost’s Terms of Service, and then hit the green “Submit” button.
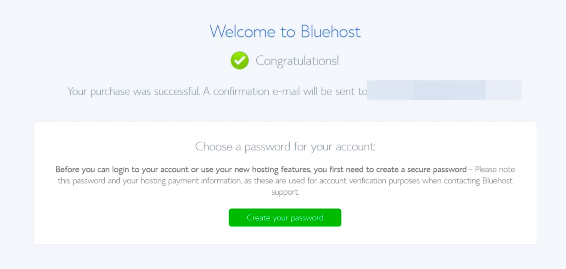
Congratulations! ?
You’ve officially completed the first major step in starting your online business.
With the initial signup process complete, it’s time to move to the next stage of getting your online business running and fully optimized.
In the next part, you’ll be guided step-by-step through the process of getting WordPress installed on your blog through Bluehost—and later on, in this guide, I’ve got a ton of helpful tips for optimizing your blog, free and cheap plugins you can install to help get your website looking great and much more.
—> Click here to head over to Bluehost and register your domain if you haven’t already.
Now, you might be wondering. “Hold up Robert!” What if I don’t want to pay a yearly fee but a monthly one? It’s just too much to pay everything all at once even if you’re saving money in the long term.
Well don’t worry, if you haven’t yet set up your web hosting with Bluehost and want to check out some other options—there are other web hosting providers worth considering.
Here are 3 alternative web hosting platforms if you prefer monthly payments
- Dreamhost — I’ve checked literally dozens of websites on Dreamhost. Some of its features like 1-click WordPress install, free SSL certificate, and site security aside, one of the biggest pros of going with Dreamhost compared to other hosting companies is that they offer a yearly and pay-per-month plan. A yearly is, of course, cheaper, but you can settle for a monthly plan that starts from $4.95. If you chose their 3-year plan, your monthly expenses can go down to $2.95. However, you’ll have to pay separately for a domain name.
- Kinsta — This is probably the best hosting solution on the market. They provide premium managed hosting powered by Google Cloud with a focus solely on WordPress websites. They are top-notch and perhaps the best in the world. However, in terms of price, you pay for what you get. Their cheapest package starts at $30, which is paid per month. But if you sign up for their yearly plan, you’ll get 2 months free. And they have a demo version to try out their services. All in all, you’ll only receive the best service you can get on the market.
- Siteground — They offer fully managed hosting, which means they give their clients automatic WordPress updates. They offer a wide variety of hosting plans. SiteGround has three shared hosting plans, which range from $3.95/month to $11.95/month. This price is only applicable to your first term, meaning once it’s over (you can commit to a 1, 2, or 3-year term), you’ll be charged full price.
Be aware that the steps with these hosting companies are varied. Also, you will have to buy your company’s domain name separately from Namecheap. This will be an additional yearly cost.
Launch WordPress
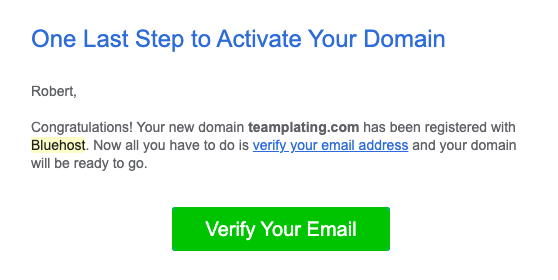
By this point, we are under the assumption that you’ve already registered your domain name and chosen the right hosting plan. So if you haven’t done so already, take just a few minutes to quickly launch your domain.
Once you’ve made the payment, you will get a verification email along with payment verification. You need to verify your email first and you are good to go. Your website has taken its first breath!
The following steps are very easy. You just need to enter your password and log in details. You will be taken to a new page where you can select your theme, or simply scroll down and click on “skip this step.” You can always pick a new theme and the ones I recommend will come for free. So you don’t need to worry about these.
If you’ve never worked with WordPress it will be super easy, I can promise you, this won’t get too technical.
3.1, How to Install WordPress and get Friendly with its Dashboard
Once you’ve created your password you will be taken to Bluehost’s dashboard where you can click on “Log in to WordPress” and be automatically taken to your WordPress Dashboard.
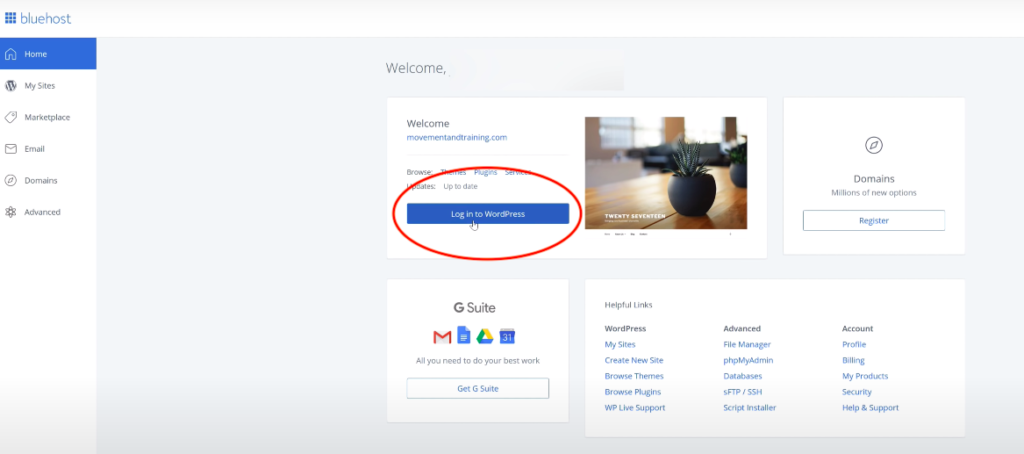
Once you get to this point, you can officially start the design of your website.
This is where progress begins.
Below is your WordPress dashboard where you will be able to create pages, design your them with themes, write and publish new content, upload extensions called plugins, create your webshop, and much more.

In the meantime, you might be asking yourself: “But why WordPress?”
If you want to start a website and make real money from it, WordPress is your only smart option. Let’s cover some basic terminology, so you understand why WordPress is the right platform (also known as a Content Management System or CMS) to run your website on.
What is a Content Management System (CMS)?
A Content Management System (or CMS) is where you’ll be writing, designing, editing and publishing your articles, blogs, videos, and setting up your pages. A good CMS (like WordPress) is easy to use, let’s you organize your content, upload high-quality images and videos. You can have control over how your entire website’s looks using themes or custom design elements.
What is WordPress?
WordPress is the most popular CMS in the world, with millions of bloggers using it every day (including me). In fact, the latest statistics show that over 61,8% of all blogs run on this CMS, including famous websites like Ubisoft, Tripadvisor, Forbes, New York Observer, TEDx, TechCrunch, NBC, and many others.
Should I start my online business or website on WordPress (and is it free?)
Absolutely YES! There are other CMS options you can look into such as Squarespace, Drupal, Joomla, or Wix. But I strongly recommend setting up a self-hosted WordPress blog as it’s the most sustainable, long-term CMS. And it is free to use (you’ll just need a web hosting plan like Bluehost.) But most importantly that this is the ONLY option worth considering if you’re starting a blog with the eventual goal of making money in some way, shape, or form.
Since I first started working with WordPress, about 3 years ago, I couldn’t be happier with the simplicity, the number of options, and possibilities without the knowledge to code.
One thing you need to be careful of is that WordPress comes in two very different platforms. There is WordPress.com and WordPress.org. They have almost the same name, but are very different:
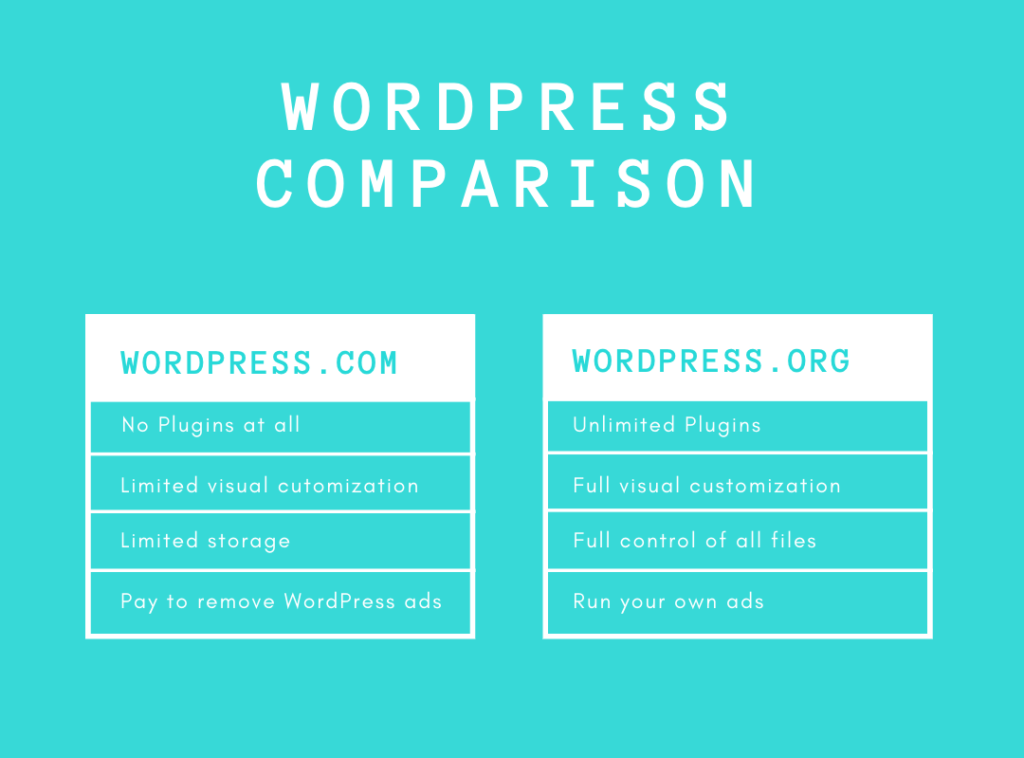
WordPress.com:
- Is free to use (with heavy restrictions)
- Doesn’t let you pick a custom domain name. So it would look like this: (i.e. ? robertkormcoczi.wordpress.com)
- Has very limited monetization options (you can’t sell your own ads)
- Doesn’t let you upload plugins (for email capture and other things)
- Has limited theme support so you’re stuck with very basic designs
- You have to pay to remove WordPress branding and get your own domain like yoursite.com
- Limited SEO and analytics
- You still need to pay for more disk space and to remove WordPress as.
WordPress.org:
- Fully customizable design, unlimited plugin options, and no branding
- Total control over your own monetization efforts
- Powerful SEO features (so people can find your site easier)
- Let’s you start or add an eCommerce store or membership site
- Small monthly fee (from the cheap hosting plan you use to get your blog online)
So remember, WordPress.org all the way! Even if you have to pay for web hosting every month or year. The choice is yours, of course, but with WordPress.com your website will lack quality and it won’t get many visitors unless you are already famous or running a well-known business. Otherwise, WordPress.org is the way to go when learning how to start a blog (and the exact process we’ve followed throughout this guide).
Design your Website with a Free WordPress Theme

When you’re just getting started, I don’t usually recommend buying a paid WordPress theme right away. Once you have some traffic and can justify the investment, then it’s smart to choose a premium, paid theme with more features and options. For the time being, a complex theme will be a distraction from your most important priority of actually bringing readers to your new blog.
What is a Theme?
I’ve mentioned this word quite often. A theme is basically a collection of templates and stylesheets you can use to define the appearance and display of a WordPress powered website. This makes it easier to choose a specific design for your website. And the ones I will list here will all be free and pretty immersive for your visitors.
Elementor and Astra
WordPress comes with a ton of free themes to choose from, so start with one of the options you like in Appearance > Themes > Add New Theme and lick on Popular on the top. You can get a ton of themes without spending much time for now. You can always come back and change it later with 2 clicks. In the top right “search” you will be able to find any theme you’d like.
What I would recommend is either use Hello Elementor or Astra. Both of these are 100% free and can be used to create beautiful pages on the spot).
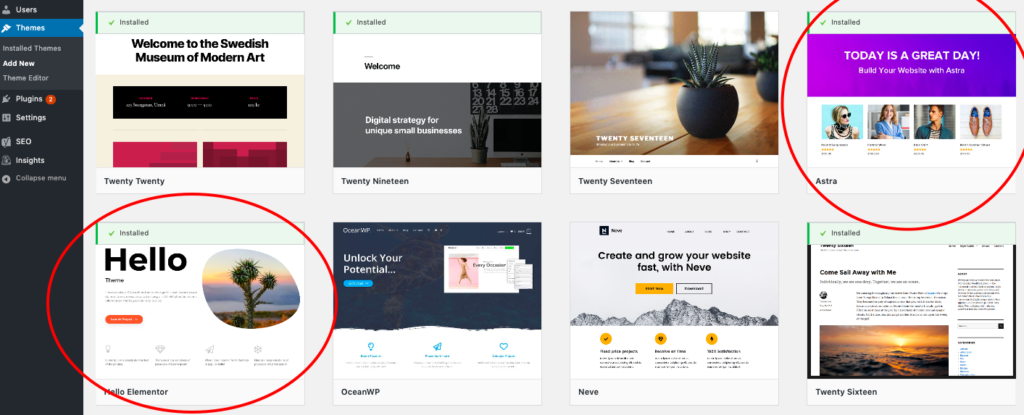
I like these two WordPress themes because they’re both easy, clean, have limited free options, simple and will get you to a great starting point without needing to invest in a paid themes as you’re starting out. (There are thousands of themes to choose from, so you can change them whenever you want to.)
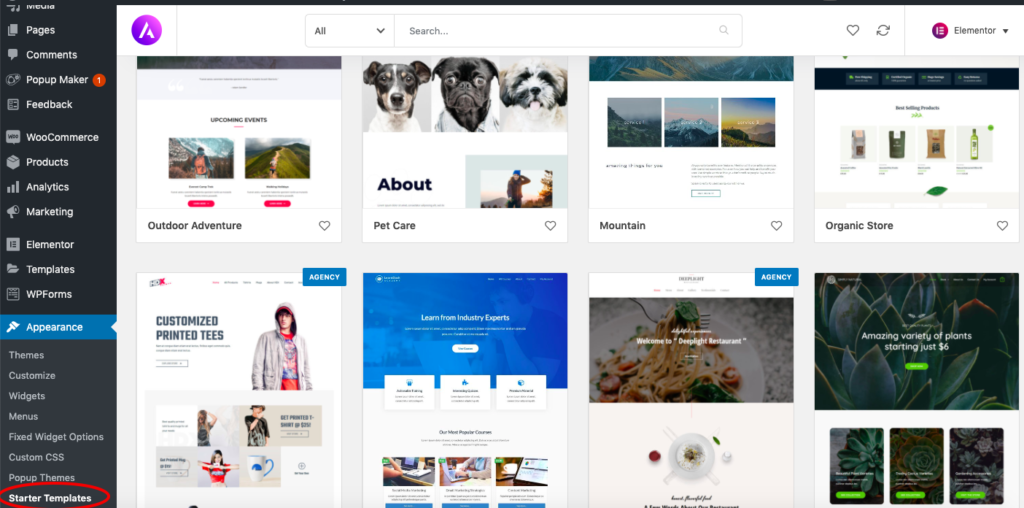
Once you have Astra as a theme, you can go to Appearance and then Starter Templates, where you can select your own outlook on your website. You can change these any time in the future.
Why is Design so Important?
The short answer is because of your readers. Even if you don’t really care about design, your page visitors will shift their behavior quite dramatically based on the features of your website’s layout.
Researchers found that users judge a website’s aesthetic beauty and perceived functionality the first moment they set eyes on your website. Black and white implies dull and over the top data.
This means that within milliseconds, a reader can decide whether or not to trust your website or click exit.
The best designs are simple, clear, and easy to read. It tells your visitors that you care enough about your website and that it is trustworthy at first glance. Just avoid using too many animations or fonts and colors.
After all, there is no perfect website. So just keep it humble and simple!
I think the design needs no special introduction. You have to test out what you like and select the theme that suits you the most. Most people I know use Elementor, a plugin, which I will talk about in the next step. This helps WordPress users design every aspect of their website and give it a charming and well-layered look.
Activate your Plugins
 A WordPress plugin is a small piece of add-on or an extension that gives extra features or functionality to a WordPress website.
Plugins let you add all sorts of features from collecting email subscribers to building webshops, tracking your website analytics, optimizing your images, increasing your page load speed, and much more.
There is basically a plugin for almost everything that you want to do in WordPress.
The only problem is that there are literally thousands or in other words: too many plugins to choose from. To help you cut through the noise, these are the 10 must-have WordPress plugins to install and activate from the start.
Any digital marketer or web designer would highly recommend and use these on a daily basis, including me. ?
- Yoast SEO: The most important one. Yoast WordPress plugin helps you to optimize your posts’ titles, descriptions, content length, and other elements across your entire blog so that you can be found easier by search engines.
- WP Rocket: This plugin helps you clean all unused data the would slow down your site. Caching creates an ultra-fast load time, essential for improving Search Engine Optimization and increasing conversions. When you turn on WP Rocket, page caching is immediately activated.
- WPForms: You’ll want your readers to be able to get in touch with you easily, which I highly recommend as it’ll encourage other page visitors to collaborate or reach out to you. WPForms is an easy-to-use plugin that allows you to drag & drop contact forms onto any page of your website.
- Google Analytics Dashboard for WordPress: This is a 100% free Google Analytics plugin that allows you to see all of your relevant analytics data directly inside WordPress. Connect the plugin to your Google Analytics account to find out who’s coming to your site, how long they’re sticking around, and what your most popular pages or article are.
- UpdraftPlus: Again, sometimes things will go wrong on your blog (and it won’t always be totally in your control). It’s always smart to have a backup plugin that’ll save all your hard work on a regular basis, and this free one stands high above the rest.
- Woocommerce: This is an open-source eCommerce solution built on WordPress. Basically you can build your very own online store for FREE, and can start selling, dropshipping, or providing online services with this plugin.
- WP Rocket: Faster websites rank better in Google and give your readers a better experience. WP Rocket is a plugin that caches your pages, reduces your file sizes, and does much more to ensure that your blog loads faster for everyone.
- MaxCDN: Speaking of speed, MaxCDN makes images and other static elements of your blog load faster as well, earning this plugin top marks to consider as a complement to also using WP Rocket.
- Mailchimp: This plugin is a software that gives you the ability to create and manage mailing lists, newsletters, automated marketing campaigns, and more.
- Elementor: If you don’t want to bother with themes, you can always use Elementor as a simple page builder. This is the most popular visual editor for WordPress and quite easy to use. And you can upgrade to Elementor Pro, where you’ll be able to create some pretty amazing features and User Experience for your page visitors, to make them come back to your page.
- Bonus Plugin – Akismet Antispam: You will get a ton of spam messages from scammers and bots as your website generates more traffic. These spam comments usually try to sell useless, nonsensical products or try to link you to spammy websites of no value. This plugin will automatically block all these useless comments.
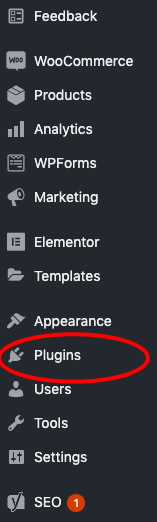
5.1, How can I Activate a Plugin?
As seen in the image below, you can click on the plugins section. Here on the top right corner in the “search plugin” section, you can enter the one you wish to add. You will get a lot of options that serve the same purpose.
Choose the one with the most stars and reviews. This shows the trustworthiness and reliability of a specific plugin. You can simply click on install, wait a few seconds and then activate.
I would say, that you should activate all the aforementioned plugins before moving forward and discover their functions one by one.
The most important ones to use at the start are Yoast SEO, Google Analytics, Elementor and Woocommerce. You shouldn’t download all four before moving forward. Later I will talk more about Woocommerce because it is the backbone of eCommerce businesses or online retailers. This is a must-have for sales and conversions.
Once a plugin is downloaded you can usually find them on the left side of your WordPress dashboard, in settings, or in your list of plugins.
However, be aware that too many plugins can cause errors and slow down your website. Therefore it is important to keep track of unnecessary ones and remove them when unused. You will also receive many plugin updates, which takes only a few seconds to do.
Manage Settings for your Business
There are many different reasons to start an online business and just as many unique goals you may have in mind. Regardless, it pays to have a basic understanding of the broader aspects of how WordPress works so that you can control the visual appearance of your website and save a LOT of time.
6.1, How to Optimize your WordPress Permalink (URL) Settings?
When you set up your WordPress article in Post using Bluehost, the permalink settings will already have a default optimized to publish new blog posts in the format of mycompany.com/post-name.
It must have your domain name separated by a / sign that is followed by post-name.
Why is this important for you? The short answer is, your content can be found easier for web searchers, bringing you more traffic.
If your permalink settings aren’t already set to this format, it’s important to change them right now. This will help you rank better in search engines like Google because your title’s text will appear in each of your URLs. If there is a date or anything else, go to your WordPress dashboard, click over “Settings” and navigate to Settings > Permalinks to make this adjustment. It should look like this here:
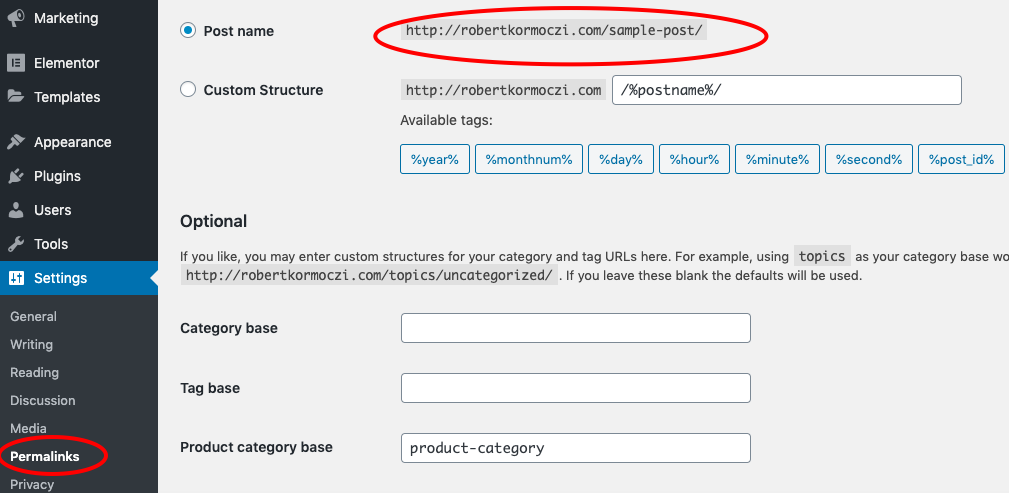
You’ll still be able to customize an article’s URL before publishing in WordPress, but now you’ve got a default URL structure that’s SEO-friendly.
6.2, Setting your Website’s Homepage
This is where Elementor and Astra plays a big role. They both provide the ability to have limited resources to build your pages. Astra already has several beautiful free themes that you can select if you want to run a simple business.
Once you go to Pages, select Home page and Edit with Elementor.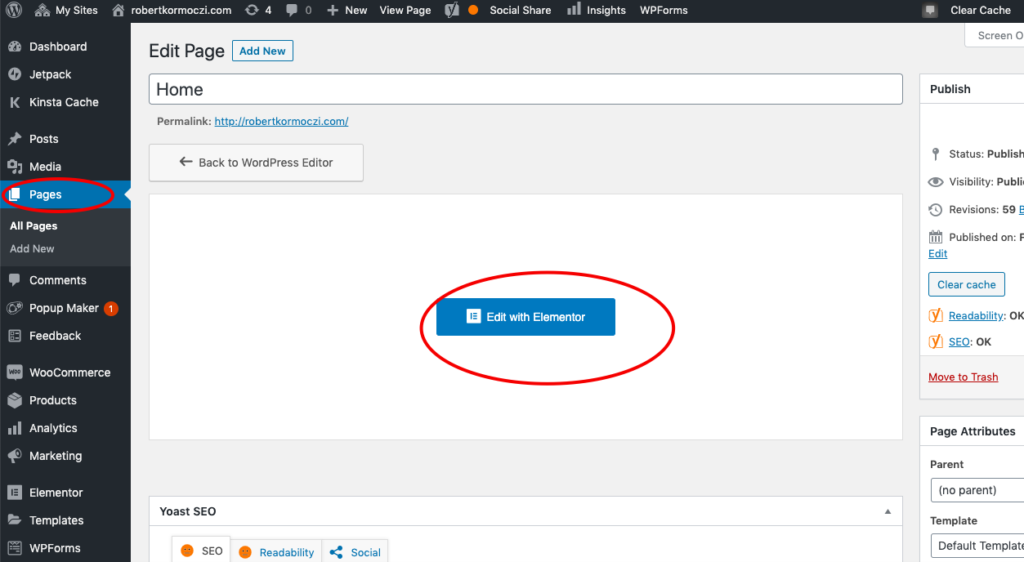
From here you will be taken to the very heart of Elementor, where you can start the front-end design of your website. The red plus sign I have circled can be used to add small details like blocks, images, and texts, whereas the Astra sign gives you a chance to add the entire layout and design of your page.
If you want to make small details to your page, it is as simple as clicking on the red sign I have circled and choosing the number of boxes you’d like to use. The rest is basic drag and drop. You can drag images, texts, buttons, spacers, google maps, etc.
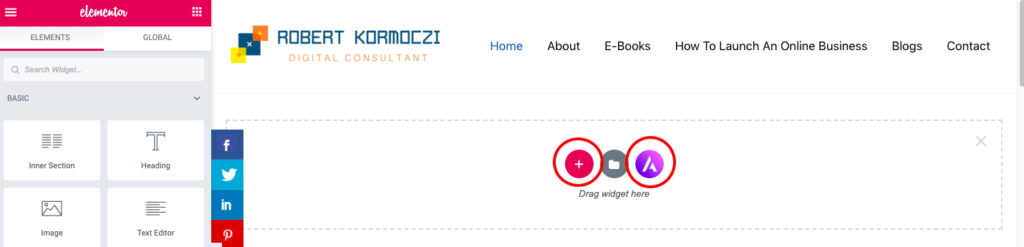
Be aware that with a free Elementor Basic comes certain limitations. You can insert images, build text, add your Google address, and design your themes. However, you cannot create slides, navigation menus, animated headlines, galleries, and much more. Since competition is fierce in the online world for customers, I would advise you, once your business starts making money, you should update to a Pro package, which can bring a ton of benefits. Elementor Pro costs $50 per year. So it’s a worthy investment in the long term to make your website stand out from the crowd.
Should I use Elementor Pro?
With basic Elementor you can build and design the general layout of your website. This is a great way to get started since you can build blocks, insert images, create a contact page and introduce yourself or your brand to your visitors. But in the long term, since every industry is competitive and design is so crucial, I’d recommend investing in Elementor Pro.
6.3, Setting up your Blog Page
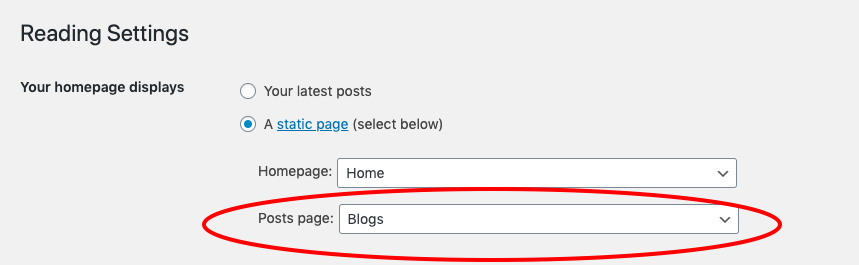
You have a choice regarding where you want to publish your articles, videos, or general content. In the Settings section of your Dashboard, you can go to Reading and select on which page you want your blogs to appear. I have a separate page for my blogs, but it is sometimes advisable to place them on your home page if that is where most people click.
We can create separate pages in the menu section in the future and call it “Blogs”, where we can transfer all your published blog posts or articles. But creating menus will be in the next few steps.
If you’re setting your homepage to be the blog, then one thing you can consider is changing the settings to show the complete text of your blog posts right on the homepage, rather than a list that has short previews of each post.
Since you won’t have many posts on your WordPress blog for the next few days or weeks, that’ll make it look like there’s more content in the short-term, and you can change the settings back to a list and preview format once you’ve gotten your first 5 or so posts published.
To change these settings, just go back to Settings > Reading.
6.4, Setting up your Website’s Menu
Every website needs to showcase some basic information. Who you are. Why people should listen to you. What info you’re providing your visitors. How they can get in touch with you if they have questions or want to work with you.
These pages are all pretty standard. But they’re a great way to let your readers get to know you better. Introduce who you are and tell your story, but also don’t make it too narcissistic or long. After a brief intro, explain your value proposition for potential clients looking to hire or buy from you. If you can, show off some of your recent achievements or references.
You might not think much about it, but your “About” page can quickly become one of the most popular pages on your website.
The first thing you need to do is to go to Appearance and from there to customize. From there you will be taken to a whole new setting where you will have the chance not only to customize your menu (pages) but work on the front end UI (User Interface) of your website.
You can experiment as much as you want as long as you don’t publish something if you don’t want the world to see your changes. Make sure that if you want to keep your changes but not let anyone see it, you can save them in “draft.”
As you can see below on my website, for example, you can customize your menu above the Widgets section. Click on Menus and the next option will appear on your sidebar.
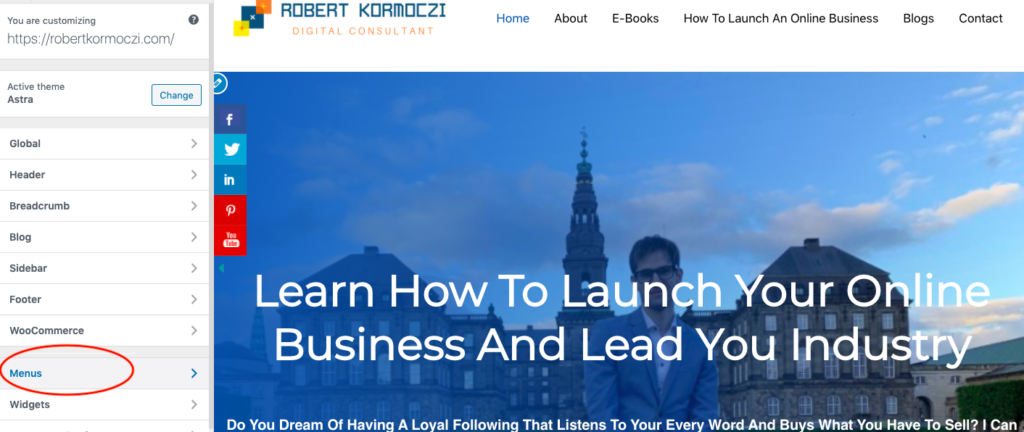
You will have the option to change the “Footer,” “Menu” and “Primary Menu.” Click on the Primary Menu or the one that says with small letters “currently set to: Primary Menu.”
You can create multiple menus or page options, but for now, I’d suggest focusing one.
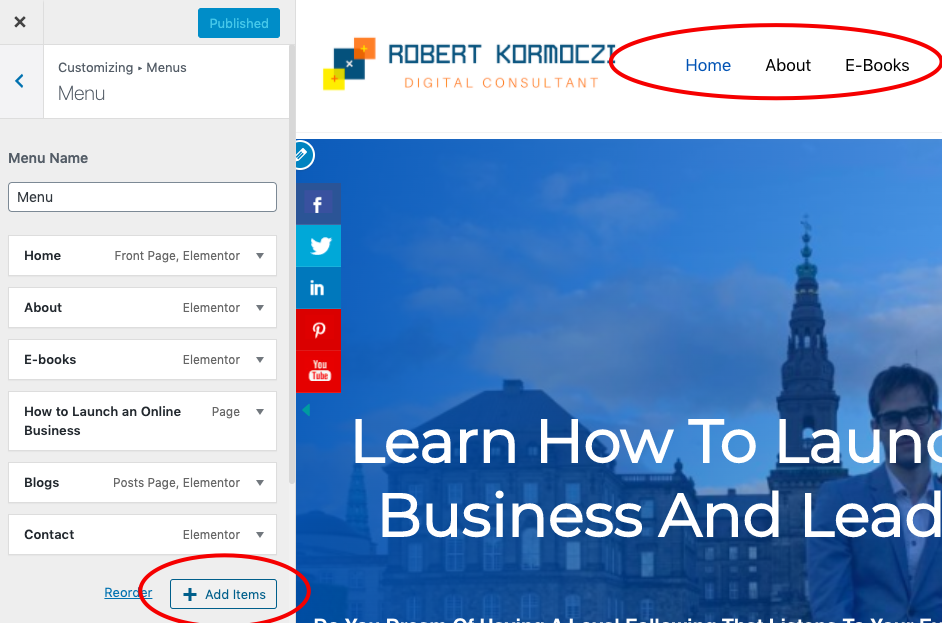
Once you’re done with all your menu options, hit Publish and it will appear on every page of your website.
You only have the chance to add or remove your pages from your menu. Just go every time to Appearance > Menus and you can add them in just a few clicks. Here you can also decide where your pages should appear, in the Primary menu (at the top) footer (at the bottom) or you can automatically add new top-level pages.
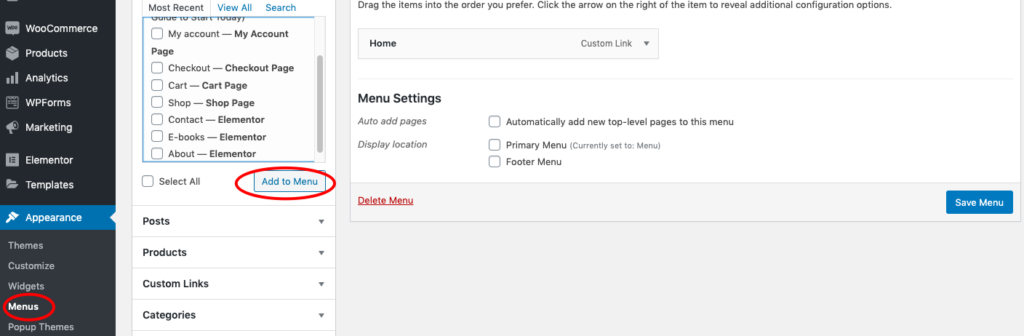
For right now, I would suggest focusing on your pages like About, Home, Blog, Contact, Shop, etc. When you’re ready to create a homepage or footer menu, just go back to Appearance > Menus and you can create them in just a few clicks.
Alright, we’ve covered the basic foundations of getting your WordPress set up. Now, let’s build your eCommerce in the next part.
Build your Online Retail Store
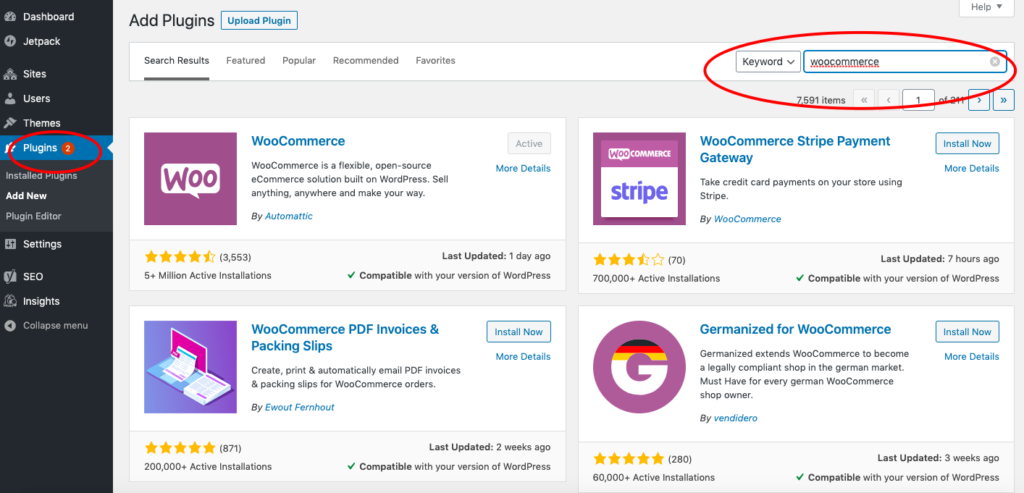
The first thing you need to do is to go to plugins once again and activate Woocommerce. That is all you need to do to get an online store. The rest is setting up everything to your liking.

What is Woocommerce?
WooCommerce is an eCommerce software that makes it easy for selling products and services online. It is currently the most popular way of selling things. This allows users to build an eCommerce website from scratch or add shopping cart functionality to an existing website.
Since WooCommerce is open-source software, not only is it 100% free, but you also get complete freedom and control over your eCommerce website.
There are thousands of beautiful WooCommerce designs and templates that you can choose from to start your online store. Each of them comes with easy-to-use customization options. Many of them are available also for free.
Why not use Shopify instead?
While Shopify is an excellent way of selling physical products or great services, there is one drawback. Its basic plan starts at $29 per month going up to $299 meanwhile, Woocommerce is free. But another reason is that we don’t need Shopify.
Shopify provides an all-in-one eCommerce platform that makes it easy for you to create an online store, accept payments, and manage your inventory without worrying about web hosting, security, or caching.
But since we are using WordPress and Bluehost as our hosting service, we got all these problems sorted out. So we don’t really need to spend any more on Shopify unless you just want an online store but don’t need a website to do it! In that case, Shopify is the perfect choice for you.
7.1, How to get started with Woocommerce?
As mentioned, go to plugins, type Woocommerce into the top right corner. Install and activate Woocommerce.
Lo and Behold! It took you less than a minute to have your very own retail store! ?
Now just like in any retail store, where you need to get a cashier, place some shelves on the walls, stack your products in their categories and put a price on everything, we need to build up our virtual store.
We will do these step-by-step as we go.
7.2, Accessing Setup Wizard
After installing WooCommerce, you’ll be prompted to walk through a setup wizard.
The first page of the WooCommerce setup wizard should look like this. Here below, WooCommerce is prompting you to enter some basic information. This includes address, the currency you’d like to use, and whether you plan to sell digital or physical products (or both).
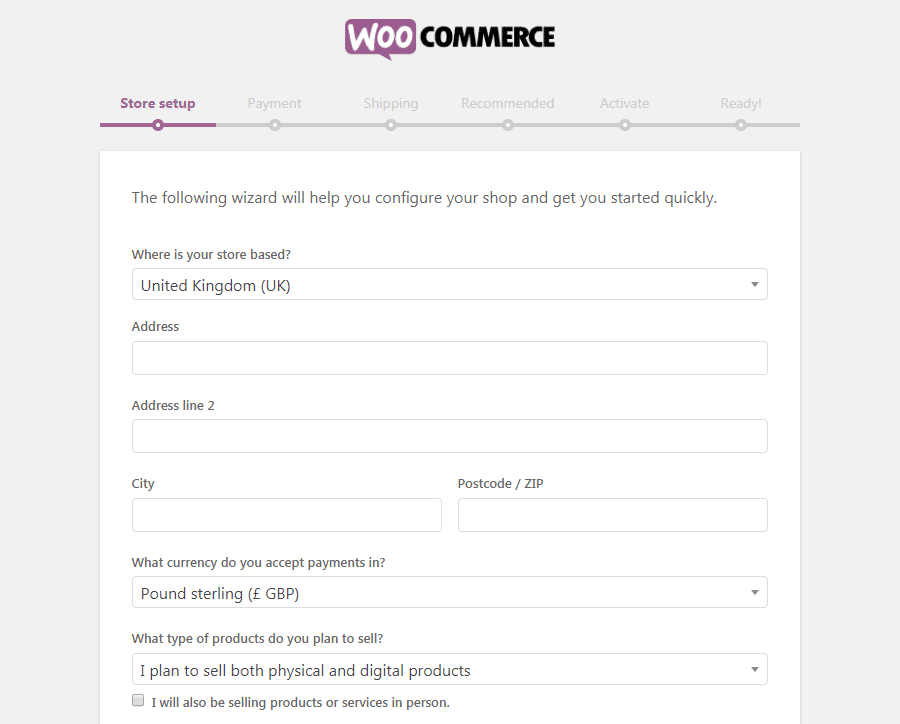
Keep in mind that anything you set here can be changed later on in your WooCommerce settings. But I’d recommend being decisive as it can impact future sales and confusion with buyers.
7.3, Choose Your Payment Process
On the next page, you can decide what payments you’ll enable for your online store. By default, you can use PayPal, along with offline payments such as checks and cash. I normally use Paypal, however, I’m not very happy with them charging a 2.9% + $0.30 per transaction. ? (But that’s just me.)
You can also use extensions to add more payment processors to your store. Simply select the options you’d like to use, and WooCommerce will set them up.
7.4, Set your Shipping Options
Once your payment is ready, in the next section you’ll find the Shipping screen.
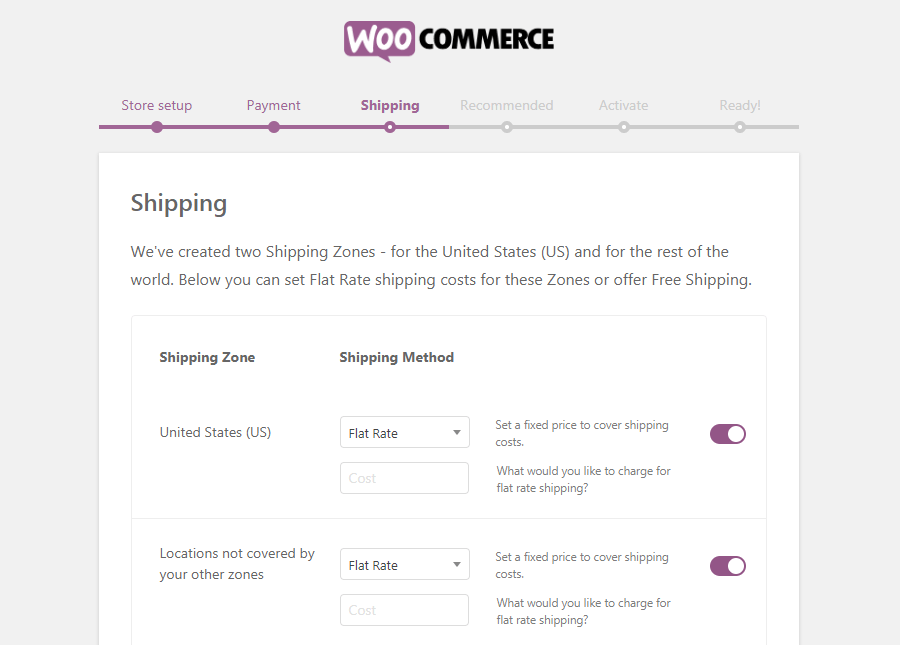
Here, you can decide how much customers will be charged for shipping. There are two options for you. You can set one rate for your preferred zone, and another for customers who are in other locations.
If you like, you can also offer free shipping to one or all groups, which customers would truly find alluring. (But this might incur an expense on your end.)
7.5, Review Optional Extensions
At this point, you’ve configured all the basics for your online WooCommerce store. The next page of the setup wizard presents you with a few optional extensions.
I would personally recommend ticking all the boxes since all the extension can come in very handy in the long term.
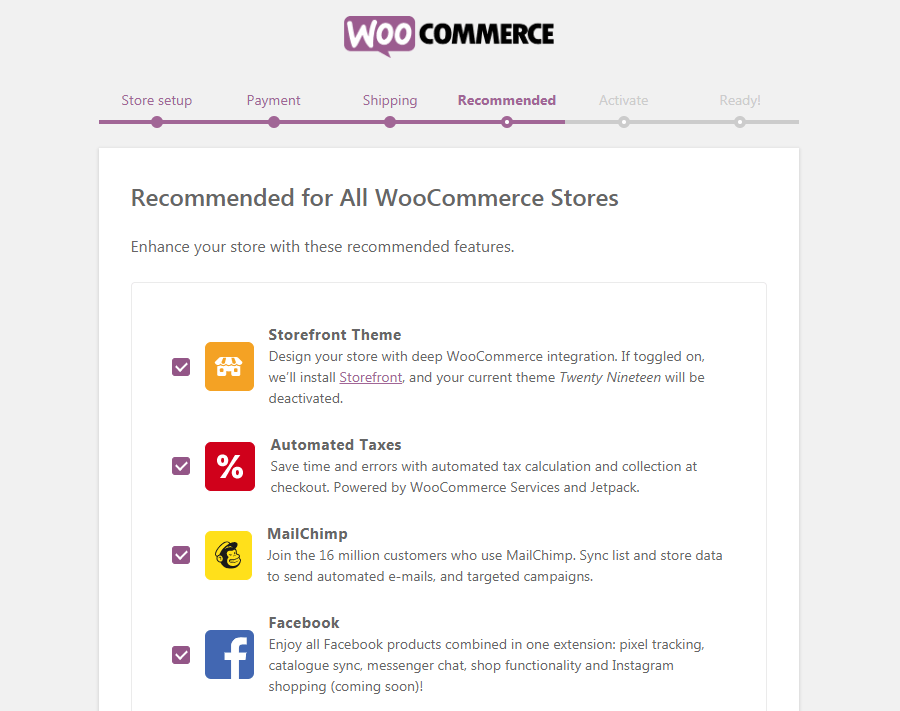
None of these are compulsory, but I’d recommend them in the future for a wider range of outreach and better User Experience. I would also suggest checking out this theme called Storefront. It is designed specifically for WooCommerce and can make setting up your store quicker and easier.
You can create beautiful pages for all your products and its very easy to use.
Once you’re done and ready to move forward, go to Activate and finally to the Ready! option.
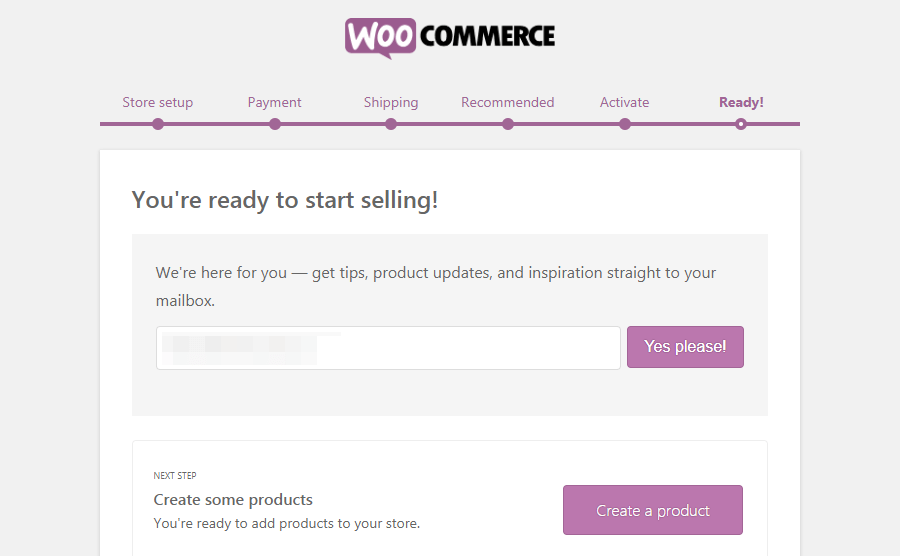
What you’ll want to do now is stuffing those virtual shelves with products. To start adding the things you’d like to sell simply select Create a Product.
7.6, Adding and Managing New Products
To start setting up your online store, you can either follow the link at the end of the setup wizard or go to Products > Add New. Either way, this will enable you to add your first product, using the familiar WordPress editor you would use for publishing articles.
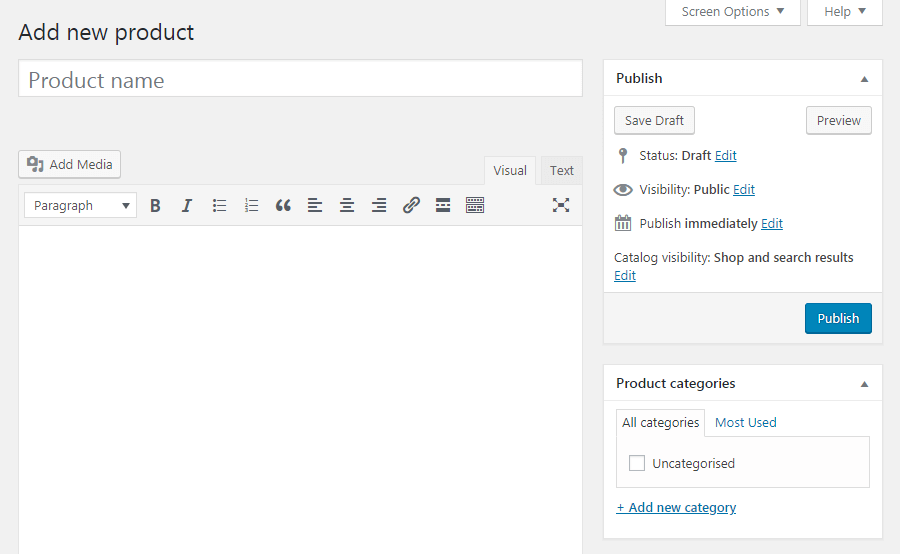
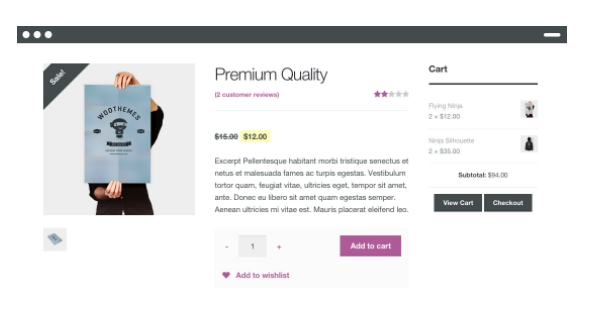
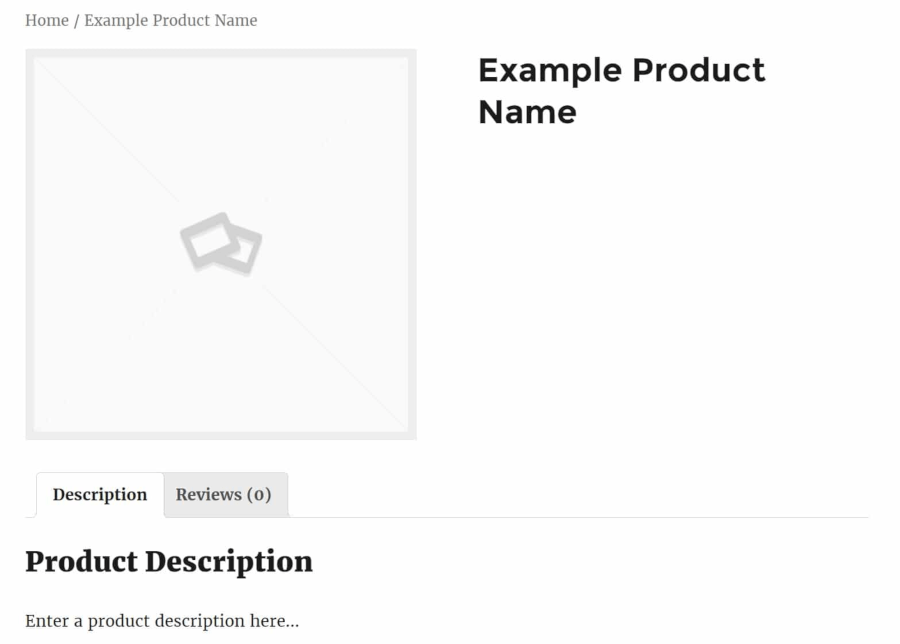
The first thing you’ll have to do is think of an image, a product/service name, the price, and a short description. Here’s what just a title and description looks like in a live preview as an example.
As mentioned, it is pretty easy! In the next few sections, we’ll look at how to do these.
7.7, Adding Important Details to Your Products
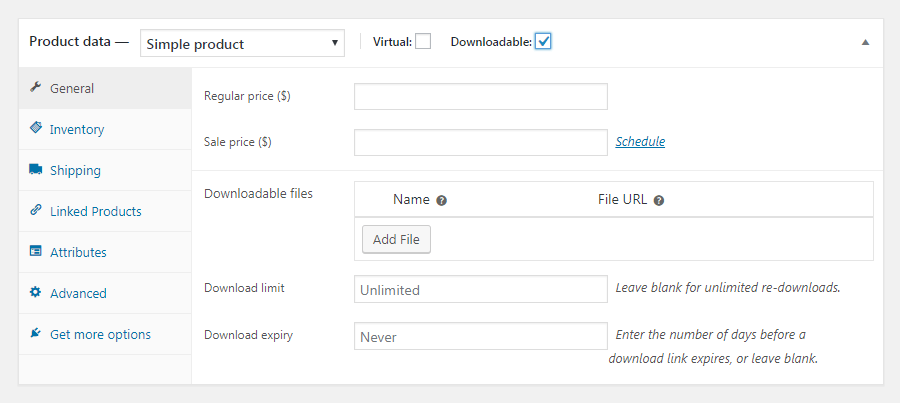
Let’s get deeper into the options and settings available for your products. If you scroll down below the post editor part, you’ll see two new widgets not found on regular posts or pages in WordPress. The first is the Product data section at the top left.

Here, you can add all kinds of details about your product. At the very top, you can select whether or not the product is virtual (which removes the Shipping tab) and if it is downloadable. In the General tab, you can enter the regular price and sale prices.
If you’re selling digital products, you’ll also have to upload the file to be purchased, customize the download limit (leave it blank to mark it as unlimited), and set the download expiry. You can leave it blank to keep it available permanently.
Next, in the Inventory tab, you can manage things by entering the quantity of the product, stock status (in/out of stock), and if you’re going to allow backorders.
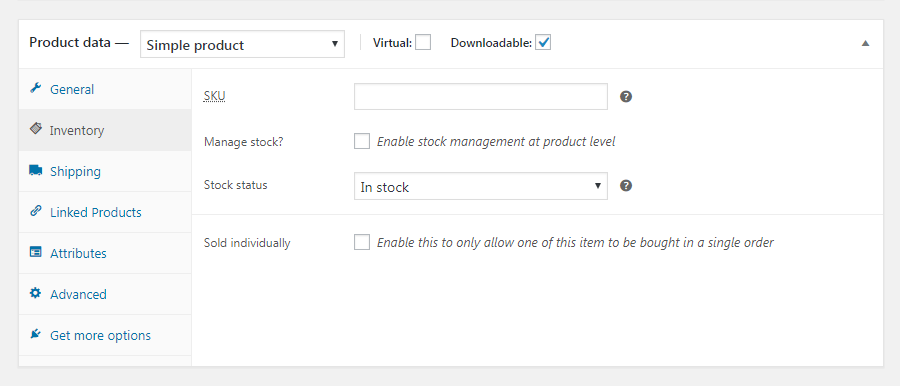
Additionally, you can mark the product as individually sold, meaning the only one can be bought in a single order. This is also where you can enter the product’s SKU (identification number) if you have one.
7.8, Here are some of the key things you can enter for your products
- Shipping: you will be allowed to enter the item’s weight, dimensions, and shipping class.
- Linked Products: you can add upsells and cross-sells.
- Attributes: enables you to describe the product’s characteristics.
- Advanced: you can enter custom purchase notes, give the product a set position in your menu, and enable or disable reviews.
- Get more options: you can also view recommended extensions.
7.9, Managing Your WooCommerce Products
If you plan on adding a large number of items in your WooCommerce store, you’ll need an easy way to manage them for your customers. Fortunately, you can do this through the Products tab in your dashboard.
For example, you can select All Products to see every item currently listed in your store. You can add, edit, and delete products here as needed.

In the other pages under the Products section, you can view your product categories, tags, and attributes. Each of these pages looks like the standard WordPress Posts > Categories page and can help you keep your entire inventory organized.
7.10, What are Coupons?
Coupons are a great way to get more customers and satisfy customer needs. They are basically discounts you can give for specific reasons. Here’s an example. Let’s say you’re selling books in December. To celebrate a Christmas special, you want to give your customers a 20% discount on books for the entire month — but only for the first 100 customers.
You can do this by going to the Coupon tab, where you can select Create your first coupon to access the editing screen. You can add a coupon code and description here.
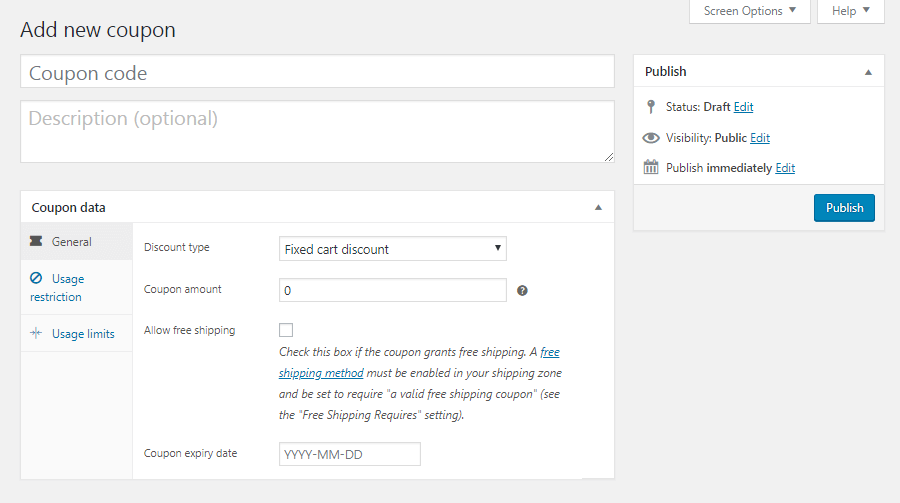
The General tab enables you to edit its basic information: the type of coupon (percentage discount, fixed cart discount, or fixed product discount), its value, free shipping options, and its expiry date.
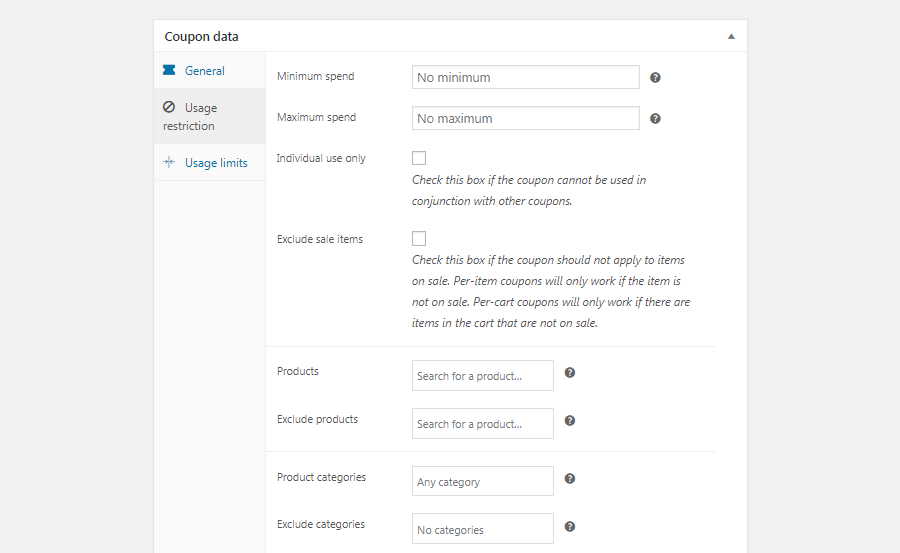
Under Usage Restrictions, you can set a minimum spend the customer has to make in order to validate the coupon. This way you can make them buy more from you. You can also check the box for Individual use only if you don’t want customers to use the coupon in conjunction with other offers.
The final tab, Usage Limits, enables you to determine how many times the coupon can be used, both overall and per customer. Then, simply publish your coupon to make it active, and let your customers know about the code they’ll need.
7.11, Reports
WooCommerce also offers powerful built-in tracking functionality. In the Reports tab, you can view charts and graphs of your sales, orders, and shipping costs over different time periods.
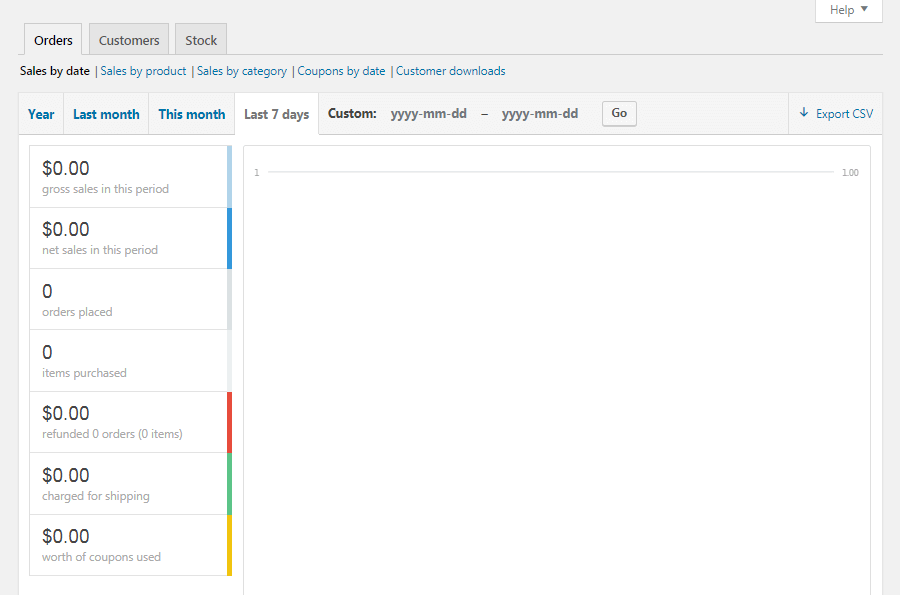
Each graph can be limited to the sale of a particular product, category, or coupon. In the Customers sub-tab, you can also view your customer acquisition over the same time periods.
You’ll also be able to review if you’re low in stock, out of stock, and most stocked products in the Stock sub-tab.
7.12, Settings
In the Settings screen, you can customize just about every aspect of your eCommerce store. Elements such as the contact option, the placement of your ‘thousands’ separator, the checkout process can be tailored to meet your needs.

Let’s go through every box in Settings and see what they are and why they’re important for you
- General settings: covers your store’s basic information, including its currency, selling locations, and display options.
- Tax: You can enable tax rates and calculations. Here, you can let your customers know if the prices you enter for your products will include taxes or not. In the latter case, you can have WooCommerce calculate tax rates for you, based on your store’s address, the customer’s shipping address, or the customer’s billing address. You’ll also be able to configure how taxes will apply to shipping costs and customize the way prices and taxes are displayed on the front end and during the checkout process.
- Product data, including measurements, reviews, stock details, download methods, and even add-to-cart buttons can be customized.
- Shipping is where you can configure your shipping zones and pricing
- Payments show you what payment processors are available and active on your store
- Accounts & Privacy controls various aspects of your customers’ experience. You can set up a privacy and checkout policy, configure how customer data will be stored and retained, and more.
- Emails: customize all things customer support. You can get all sorts of notifications in case a customer has done something to trigger an order. You can click on any of these emails to enable/disable them.
- Advanced: this tab you can enable the REST API, configure keys, apps, and webhooks, and perform other lower-level tasks.
The continuous optimization of your WooCommerce store can lead to improved conversions, more sales, and greater income. There is a TON of information out there about how to market your work. That is why once you have all your products placed you will have a grasp of how Woocommerce works.
Ok, that is a lot of info. Let’s take a coffee break before moving on to the next step!
Start Making your own Content

Finally, you have your website and your product available and ready to be purchased. Now comes the part where you need to let the world know of your website and turn it into a profitable business.
There are multiple ways to do this. The most common is through content creation such as posting your own content. Writing an article, blog, or an informative review is a great way to gets traffic.
This is important because search engines like Google tend to rank content based on several factors. If your website has a strong Search Engine Optimization (more on that later) it will rank on the first page of Google where thousands can see it.
The number one thing you must focus on is this:
Whatever content you produce, it MUST satisfy search intent! This means that whenever someone types something into Google and stumbles on your page, your article, blog, video, or any content should provide the answers for the person.
The aim of promoting your only business is to make it visible to as many people as possible and attract the right kind of people who’d actually spend money. If you provide quality content for people who Google things, you’ll land many page visitors and even buyers.
On the other hand, you can, of course, pay Google or Facebook ads to do the work. But writing quality content and putting in the extra effort can land you free traffic. You just need to know how to do this.
8.1, How to come up with unique blog post ideas that people will Read?
-
- Sit down and think about your Niche: Start by writing down as many ideas or keywords as you can. Aim for things you know your ideal audience would find valuable and you’d enjoy writing about. Think about where your expertise is and can help fill in the blanks.
- Stalk your competitors: See what your competitors in your niche are doing. If you see that they do a lot of top 10s or how-to guides, you could do the same by making your content longer. Google values longer and better-written content. This way your articles will get more exposure when people search for something in Google.
8.2, How to write your first blog post
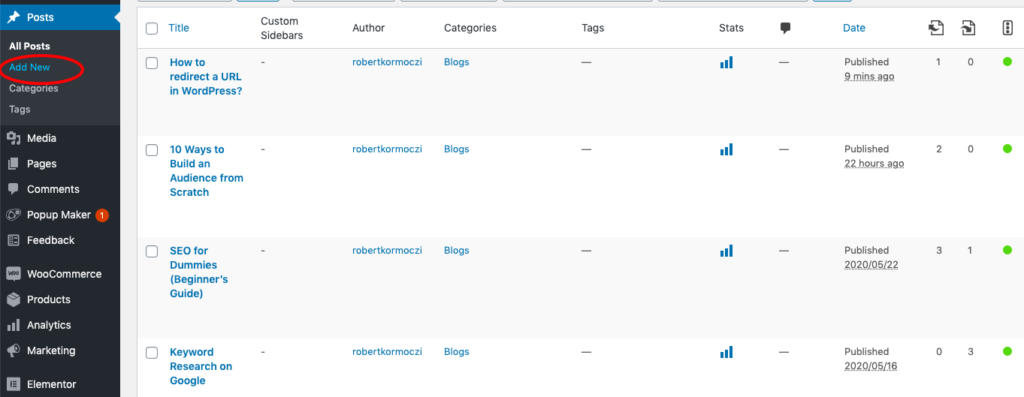
Once you’ve decided on the first article you want to write, you’ll navigate to the “Add New Post” section from your WordPress Dashboard.
Go to Posts > Add New which will look like this right here:
Next, you’ll be taken to a brand new article page where you can start working on your content:
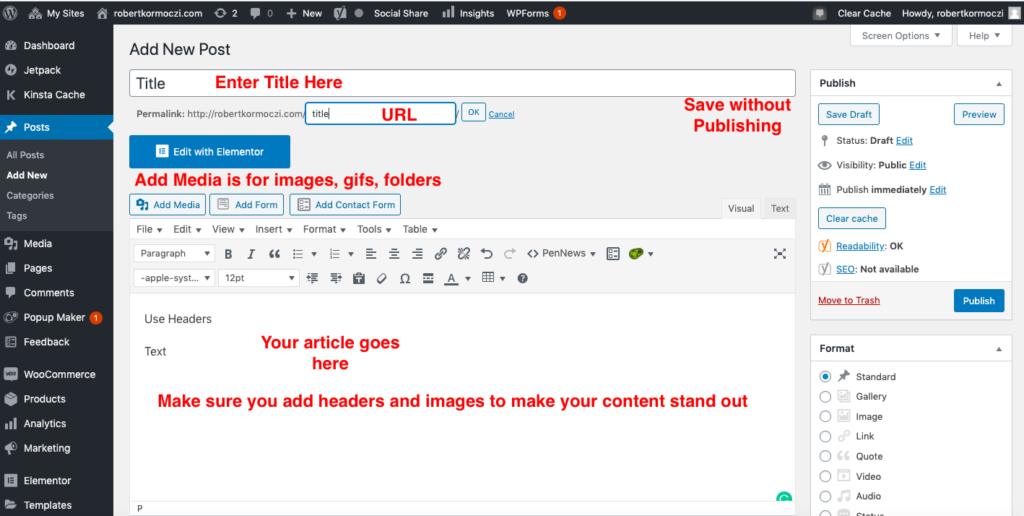
One of the reasons you chose to start an article is to attract readers to your website, right? It’s important to write an article headline that encourages readers to click. Make sure you spend time and put effort into writing headlines and content that’ll be interesting and engaging. But most importantly it must deliver on the promise of what your article is actually helping the reader with.
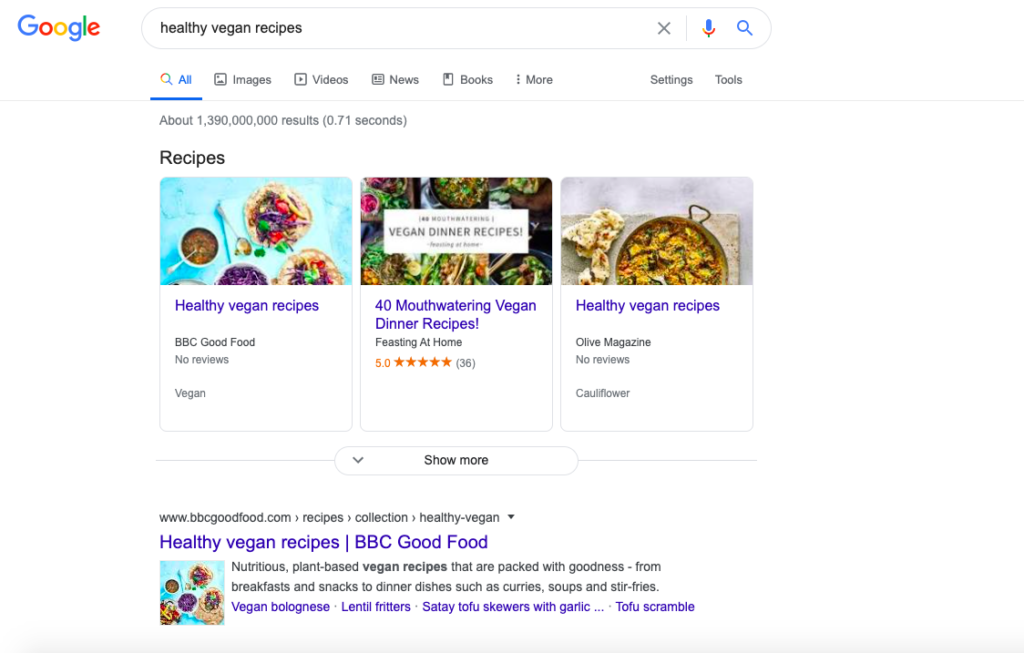
So let’s say for example that your online business is about health and fitness. After doing some keyword research, your intended first article (for example) will be about healthy vegan food. You want to write about something like “Does a vegan diet promote skin health?”
So your blog should be about breaking down some benefits of a vegan diet, explain simple nutrition values in certain foods, and explain why you believe veganism is good or bad.
Be aware that well-researched content is highly valued by all means. But beyond providing quality and informative content, you need to understand keyword optimization.
If you need help with understanding Keyword Research, I have three complete and easy guides on the topic to maximize your articles’ readership and outreach.
- Keyword Research on Google
- How to Build Traffic to your Website
- 10 Ways to Build an Audience from Scratch
But in short, keywords are ideas and topics that define what your content is about. In terms of SEO, they’re the words and phrases that searchers enter into search engines, also called “search queries.”
Keywords play a major role for people on Google, Bing, or Yahoo to finding your articles and even buy from you. For example, below I have searched for the keywords “healthy vegan recipes.”
The first articles that popped up are the ones with the strongest domains because they are trustworthy, quality content that Google deems that it will satisfy search intent.
A good starting point before writing strong article titles is to sneak a peek at your competitors in your niche:
- Do they often start with numbers? (f.ex.: 10 ways to win, 20 of the best, 15 most used, etc.)
- How many of their article headlines include parentheses?
- Are they posing a question? (Who is the fastest person in history? How many people live in New York?)
8.3, Essential best practices for writing a great headline and content
How to create an article or blog that gets the reader’s attention. I’ve read thousands and wrote literally hundreds of blogs throughout the past 3 years. Oh, and I made a ton of mistakes before understanding certain key points for immersive and catchy content.
- Build a list, like (10, 20, 35 or 100 of the best/biggest/most) to capture a reader’s attention
- Focus on providing evergreen content. What is that? Evergreen content is basically something that holds value in the long term. It revolves around a topic that’s always relevant to readers, regardless of the current news cycle or season. For example and article that talks about how to take care of your pet cat? If someone were to click on your article in 2023, the article would still hold value for the reader, because it provides the same values as it did today.
- Place a part of the headline within parentheses to make it stand out more
- And most importantly… don’t try to deceive your readers. Make sure your headline matches the intent of what your reader is hoping to achieve. This way they’ll spend more time and keep coming back to your website.
8.4, Optimizing your Posts
Once you’ve written your first article in Posts (and ideally reach about 1,000 to 2000 words) you’re almost ready to publish!
But before you do that, there is one very important thing to consider! Remember the plugins I mentioned and how important some of them are? Well, this time you’ll have to have a look at Yoast SEO.
Basically, once you’ve activated Yoast SEO at the bottom of every post or page you will see Yoast SEO’s suggestion to see if your article is SEO friendly.
The more SEO friendly your article, the better Google will rank it and the more people will find your content when they type on certain keywords that are related to your article. I will talk about these more in the next chapter. Until then, keep your articles in draft.
Are photos necessary and how often should you use them?
Studies show that blog posts with images get 94% more views than those without. This actually makes a lot of sense. People, including me, hate to see black and white text And when it comes to posts getting shared on social media, tweets with photos get 150% more retweets than those without one, while Facebook posts with images get 2.3X more engagement.
Simply adding a few visual elements can almost double the number of views and significantly expand the shares a post gets.
Now, it’s pretty unrealistic to think that you’re going to hire a professional photographer to work on your new blog. Especially, since we are on a tight budget here. So you’ll have to get those photos yourself. But you can’t just simply copy the first image you see on Google without permission or license.
8.5, Where can you get your Free Photos from?
One of the easiest ways to add some design elements to your website is with images.
While the words “stock photography” might make you think of cheesy photos of awkward people in a fake office with their thumbs up… in recent years, there have been a number of much higher quality sites pop up that offer incredible photography that’s completely free to use for your blog. Here are my two favorites:
1. Unsplash
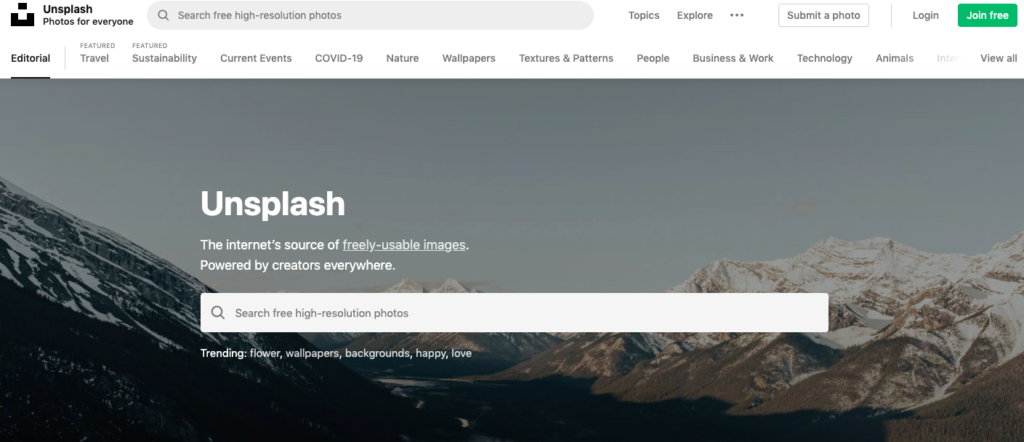
Unsplash is probably the best online resource of completely free-to-use, user-uploaded photos for your blog. Every photo that makes it onto Unsplash is curated by their team to make sure it’s high quality, meaning you’re not sifting through terrible photos to find the one you’re after.
Under the Unsplash license, you don’t even have to attribute the photographer (however, they recommend you do!) Making it the easiest option for free blog photography.
2.Pixabay
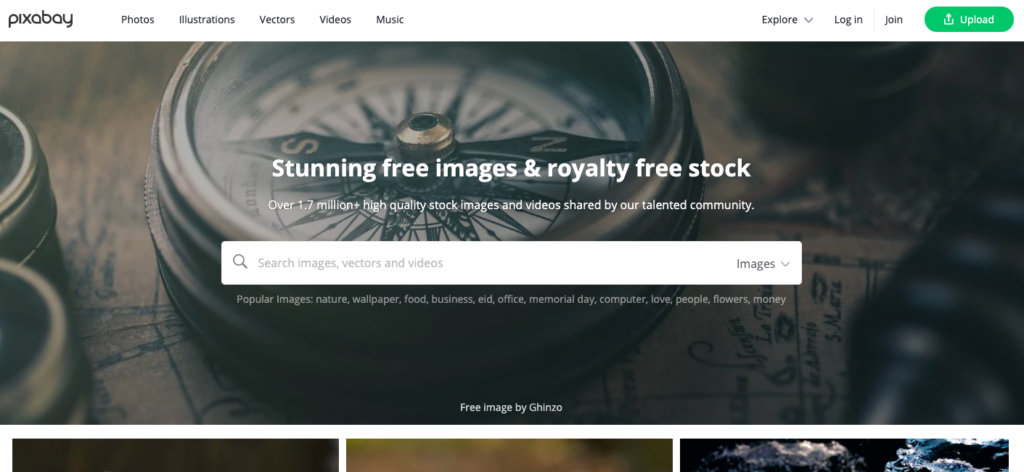
If you’re after quantity over quality, Pixabay has a collection of 1.4 million photos, videos, illustrations and vector graphics you can use for free. Many of these are from other free stock photo sites and the quality isn’t as curated as the other two I mentioned, but it’s still a good option if you want to spend some time scrolling.
8.6, Free image design resources
There are lots of great design resources out there that can elevate the design of your posts.
let’s forget about the complications that come with Adobe Photoshop. Here are three I image designers that can be used quite a lot and they offer a huge variety of images.
1. Canva for social media and feature images
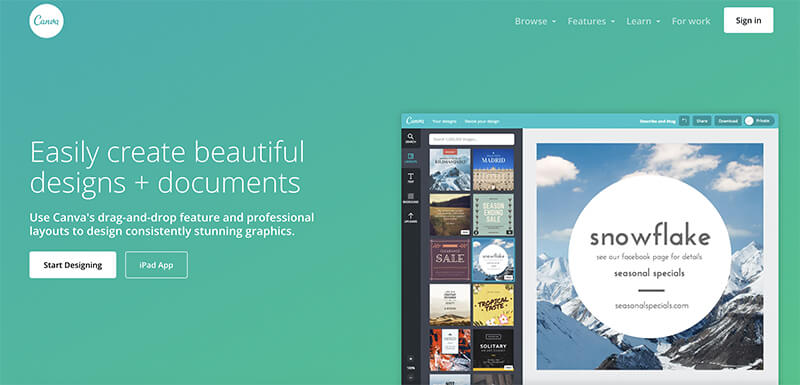
Canva is an incredible free design tool that’s been around since 2012. It’s got drag and drop templates for pretty much any design element you’d need for your blog, from social media posts for Pinterest, Twitter, and Facebook to custom quotes.
Basic usage is free and you get access to a ton of design resources, logos, and photos.
2. Pixlr for Photo Editing

More advanced online photo editing just in case if you are comfortable with tools like Photoshop. It has a free version with limited resources like limited stickers and overlays. The only downside of a free version is that you’ll have to put up with their ads.
3. Visme for infographics
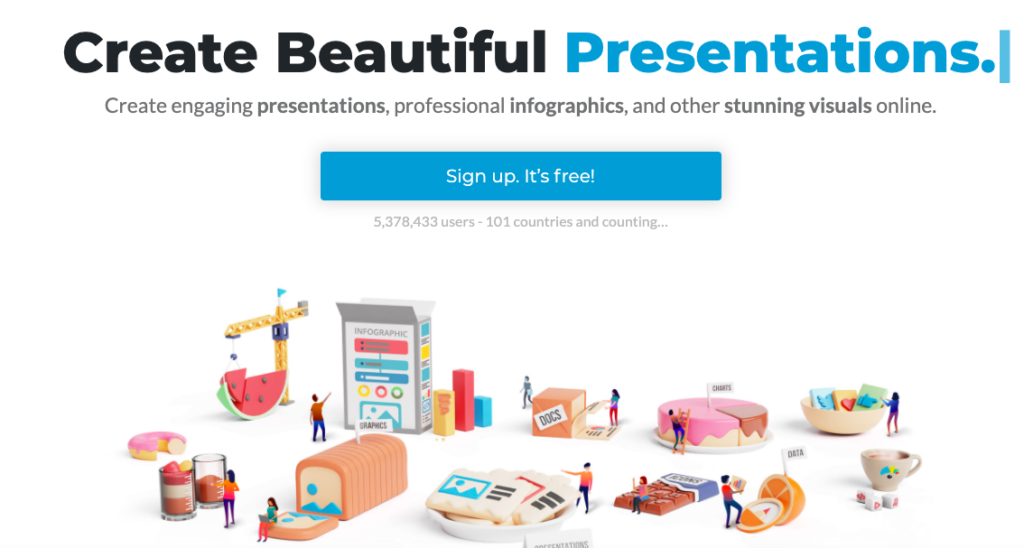
Like Canva, Visme is a free online tool that lets you make custom designs for your blog. After quickly signing up, you’ll be able to choose from hundreds of templates for blog graphics, infographics, social posts, and more.
4. Noun Project for small icons
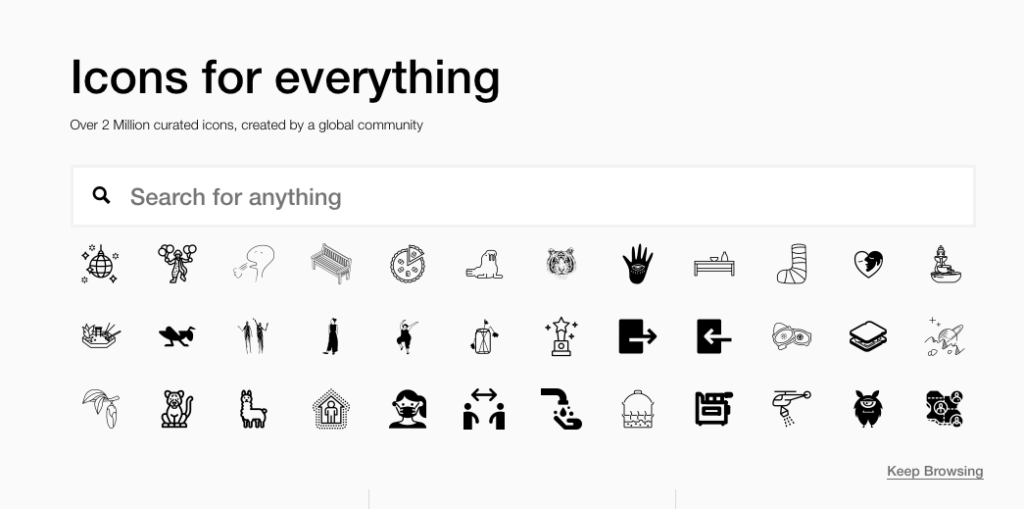
With over 1 million free icons, you’ll have plenty to choose from, making it a fantastic resource for having fancy icons.
Build your Audience
There are many ways to attract an audience, both online and offline. In this chapter, let’s focus more on the online part and expand some common and less known tips to attract more followers, visitors, and fans to your business. Be aware that every niche and every market is very competitive. Therefore we need to stand out from everyone else and dominate over websites and businesses that have stronger Domain Rankings.
9.1, Understanding SEO (Search Engine Optimization)
SEO can be a challenging task for any content creator, business, or blogger. That is why this SEO for Dummies is a good start for anyone who just started writing online articles and wants to attract readers.
And if you are new the term, it can seem like a daunting task. To get the most benefit from SEO, it is important to understand what it is, its functions, and why it can help you get visitors to your website.
What Does “SEO” Stand For?
As mentioned earlier SEO stands for Search Engine Optimization.
It’s a hotly debated topic in the marketing world and there are LOTS of content written about it online:
 SEO in Search results
If this is too much to take in, let’s explore everything stepwise.
What Is SEO?
SEO is the process of improving your website through the content you make so that it ranks higher in search engines like Google, Bing, or Yahoo for certain keywords. (Normally people focus on appearing in Google.)
This way, the closer your article or content or website is to the first page of Google, the better your chances that someone clicks on it. Strong SEO means that your website is good enough to rank on the first page of Google where everyone can see it.
So you get the idea:
SEO is made up of certain strategies and tactics that focus on driving more traffic from Search Engines to your pages.
Why Should You Care About SEO 
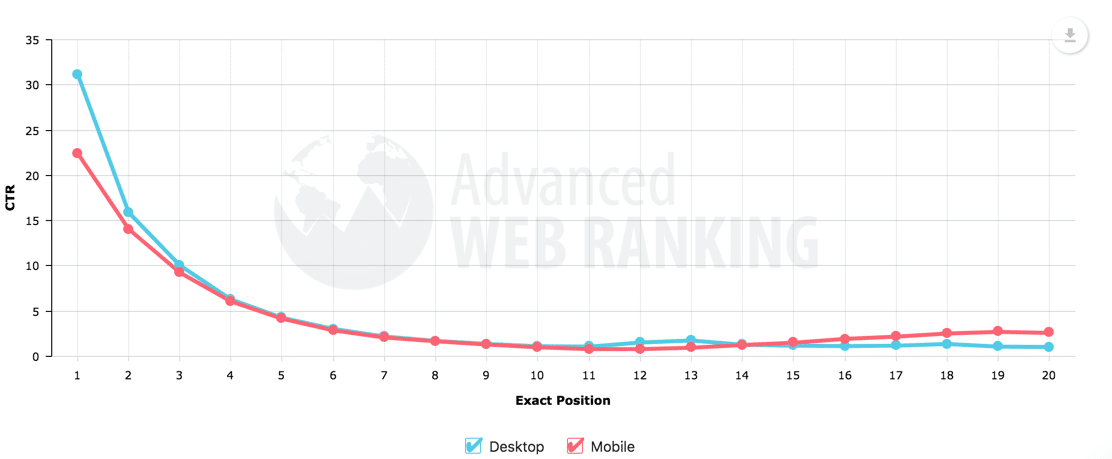
Simple, you get free traffic to your website. According to research, websites on the first page of Google receive the majority of clicks. I mean, to be completely honest, we rarely go the second page of Google search to find information. The further your article ranks, the less the chance that someone reads it. As you can see below the CTR or (Click through Rate) in Google steadily decreases the further down the page ranks.
Advanced Webmetrics Study
If you get your SEO right, your organic traffic ( search through Google by random people) can build over time, whereas paid advertising needs ongoing funding.
And considering that search engines drive 93% of all website traffic, that’s a lot of visitors. For example, my website I’ve launched in early 2019 has now 25,000 monthly searches. (And this is very little in comparison with what many others who are working full-time on their websites.)
Understanding SEO and optimizing your site will help you give search engines the information they need, so you can get the results you want. Just remember that SEO is a marathon, not a sprint. It is free, but takes time.
How long does it take for a blog to rank?
According to a study by Ahref, it usually takes a minimum of 4 days to even 6 months for an article to start ranking on Google. But to rank in the top 10, it might take between 2 to 6 months. From personal experience, if your website is completely new, it might even take up to one year before it gets a traffic boost.
Some work upfront can pay off in organic traffic later down the line.
 My Google Analytics Graph
While paid advertising, social media, and other paid channels can get traffic to your site instantly. BUT, if you stop paying the traffic also stops. SEO, on the other hand, can be an ongoing source of traffic for many months or years.
9.2, How to Think about SEO
Search engines are designed to find information and provide answers.
When it comes to search engine algorithms, Google looks at millions of web pages to come up with the most relevant information for users and bring them to the first page.
 Google wants to provide the best answers to a user’s searches and queries. There are 3 golden rules you have to bear in mind when questioning the role of SEO:
- Google is made for answering people’s questions.
- Google has all the data and knows more than anyone.
- Google wants to have answers and not tricks to get better at ranking.
So what do you need to do to get your ranking website or article to rank better? Well, I have just the solutions for that. Actually 3 very simple solutions:
- Answer questions better than anyone else on the Internet.
- Don’t make stuff overcomplicated.
- Don’t try to trick Google with often short-term tactics.
 9.3, How to get started with Keywords?
Assuming that you have your own website by now, Hopefully, you are starting to see now that SEO isn’t that complicated.
In fact, it’s pretty simple. Well, at least the basics are.
Getting a few SEO fundamentals in place can make a BIG difference to your site’s ranking. After all, most people who run sites are not SEO experts.
By just getting a few things right, you’ll be on your way to getting Google to send you traffic in a short amount of time.
Sound good? Let’s go.
We have already selected a trustworthy hosting provider like Bluehost, Hostgator, Dreamhost, or Kinsta. This is an essential part of technical SEO we have done already. These hosting companies can ensure page speed optimization, credibility, and not just a junk site for spamming people and maintenance. All these play a major role in SEO.
9.4, Write Content People Want to Read
Easier said than done. But this is perhaps the most important part of SEO. High-quality content will always dominate above all else.
I’ll be honest. There’s no secret sauce here, no science or hidden tech. Good content is just what people want to read and its what matters the most. Sure, there are some content marketing strategies to keep in mind like keyword searches, social media shares, or word of mouth.
But diligent work that gives people pragmatic content is what Google loves using. Imagine you have a sore throat and type into Google: “sore throat medication.” If someone were to write a detailed article that talks about symptoms, precautions, and remedies on the topic would rank well.
There are 4 things you can do to improve your content for SEO while writing:
- Improve readability score: Most people skim content on the web, so make sure to break up your content with subheadings and bullet points to make sure people aren’t scared away by a massive wall of text.
- Use images: Visual content like screenshots, GIFs, and images are important to enhance your content.
- Go in-depth: Longer content may not always be the right choice. But the detail is key. So when it comes to content length, usually longer articles are generally ranking better.
- Use facts and stats: If you are stating a fact or using a statistic to illustrate a point, link to a reliable source or study that supports it.
9.5, Optimize Your Content (For Organic Traffic)
Just having content up on your site isn’t enough. You need to optimize it to show up in Google for the desired keywords.
Each page or post should have a “focus keyword” it is optimized for. This doesn’t mean it can only rank for that, in fact, a page can rank for many terms. But to keep things simple, you want to structure your on-page optimizations around one keyword or key phrases.
If you have your own WordPress website, you have to focus on these 4 points:
- Title
- Content
- Meta-description
- URL
Let’s go through each of them to see how you must optimize each and every article you wish to publish.
9.5.1, Titles
Titles are one of the main ways that Google can understand what your page is about. You want to make sure that the main keyword you want to rank for is in the title tag. As you can see below and in my this article of course, that my keywords are “SEO for Dummies.” I have tried to apply this several times in my article.
You want to get your main keyword in the title, but in a natural way. Your title tag is often the first thing people will see on the results page for searching a keyword. So make a good impression and make them want to click through and read more on your site.
It should also be pointed out that the title tag is not the headline you see on the page. But I would recommend adding the keywords of your title into the headline. A good rule to aim for is 55-60 characters and not more. Keep the title short and sweet.
9.5.2, Meta Description
If the title tag is your page’s headline, the meta description is the one-line summary enticing people to read on.
Meta descriptions are another HTML element that cannot be seen on your actual pages. Here’s an example of one in the wild:
Sometimes, Google chooses not to display your meta description and will generate its own for you. But that doesn’t mean you should not bother writing them.
Writing a good meta description can help you get people to click through and actually visit your website. Remember: showing up in the SERPs is just the first step. You still need to get them to visit your site.
9.5.3, URL (Uniform Resource Locator)
When it comes to SEO, there are two main things to keep in mind with URLs:

- Rankings: URLs are a small ranking factor. So, ideally, you want to put the main keyword you want to rank for in the URL. And you want to make it short. Preferable 1 to 5 words maximum.
- User experience: A good URL should be easy to understand for both search engines and real people. Consider this: can you tell what the page is roughly about by just the URL alone?
Just by looking at this URL, we can tell the page is probably about SEO. (Obviously) 
Let’s Rewind
Wow, that was a LOT of info to digest, I know. But once you’re through with all these, you won’t need a web developer or a tech Guru to empty your wallet. You’ve saved thousands of dollars. Literally!
All that remains now is to pump-out those online promotions and target your customers with a ton of quality articles. Let the world know about your business.
Let’s Recap a Little on what we’ve Done in these 10 steps.
- We have chosen a company name and narrowed down our niche.
- We have activated Bluehost and signed up for one of its yearly package (or choose a different hosting service) and finally launched our web domain. Also, we have created the domain name we have chosen.
- With Bluehost, we have downloaded and activated WordPress and got a brief glimpse at its dashboard.
- We began designing your website with different themes like Astra and plugins like Elementor to make it look more attractive.
- Plugins have always been the key extensions of WordPress and now we have filtered the ten most important ones that you’d need for your business to flourish.
- Some of the basics of WordPress are to establish certain optimization and we went through these basics to get a clear glimpse at how the backend of WordPress really works.
- This was perhaps the longest and most demanding task. Building up an online retail store with a free customizable plugin called Woocommerce. But the pay off is huge when sales keep rolling.
- One of the most common ways of getting traffic to your website or business is online is to provide useful and pragmatic information to satisfy search intent. We have looked into some of the key elements to construct user-friendly blog posts.
- We have also taken a deep dive into content marketing through SEO and keyword optimization to understand what generates traffic.
- And here we are, recollecting this long journey! ?
I truly hope this guide made your journey easier.
If you’re stuck or struggling, make sure you leave a comment below!

Robert is a part-time blogger and internet entrepreneur. Join Robert and thousands of other monthly readers to learn how to build and scale up the next-gen of online entrepreneurship. While running this blog, Robert is the founder of his media company, Times International, and a PR Team Lead at Lensa.